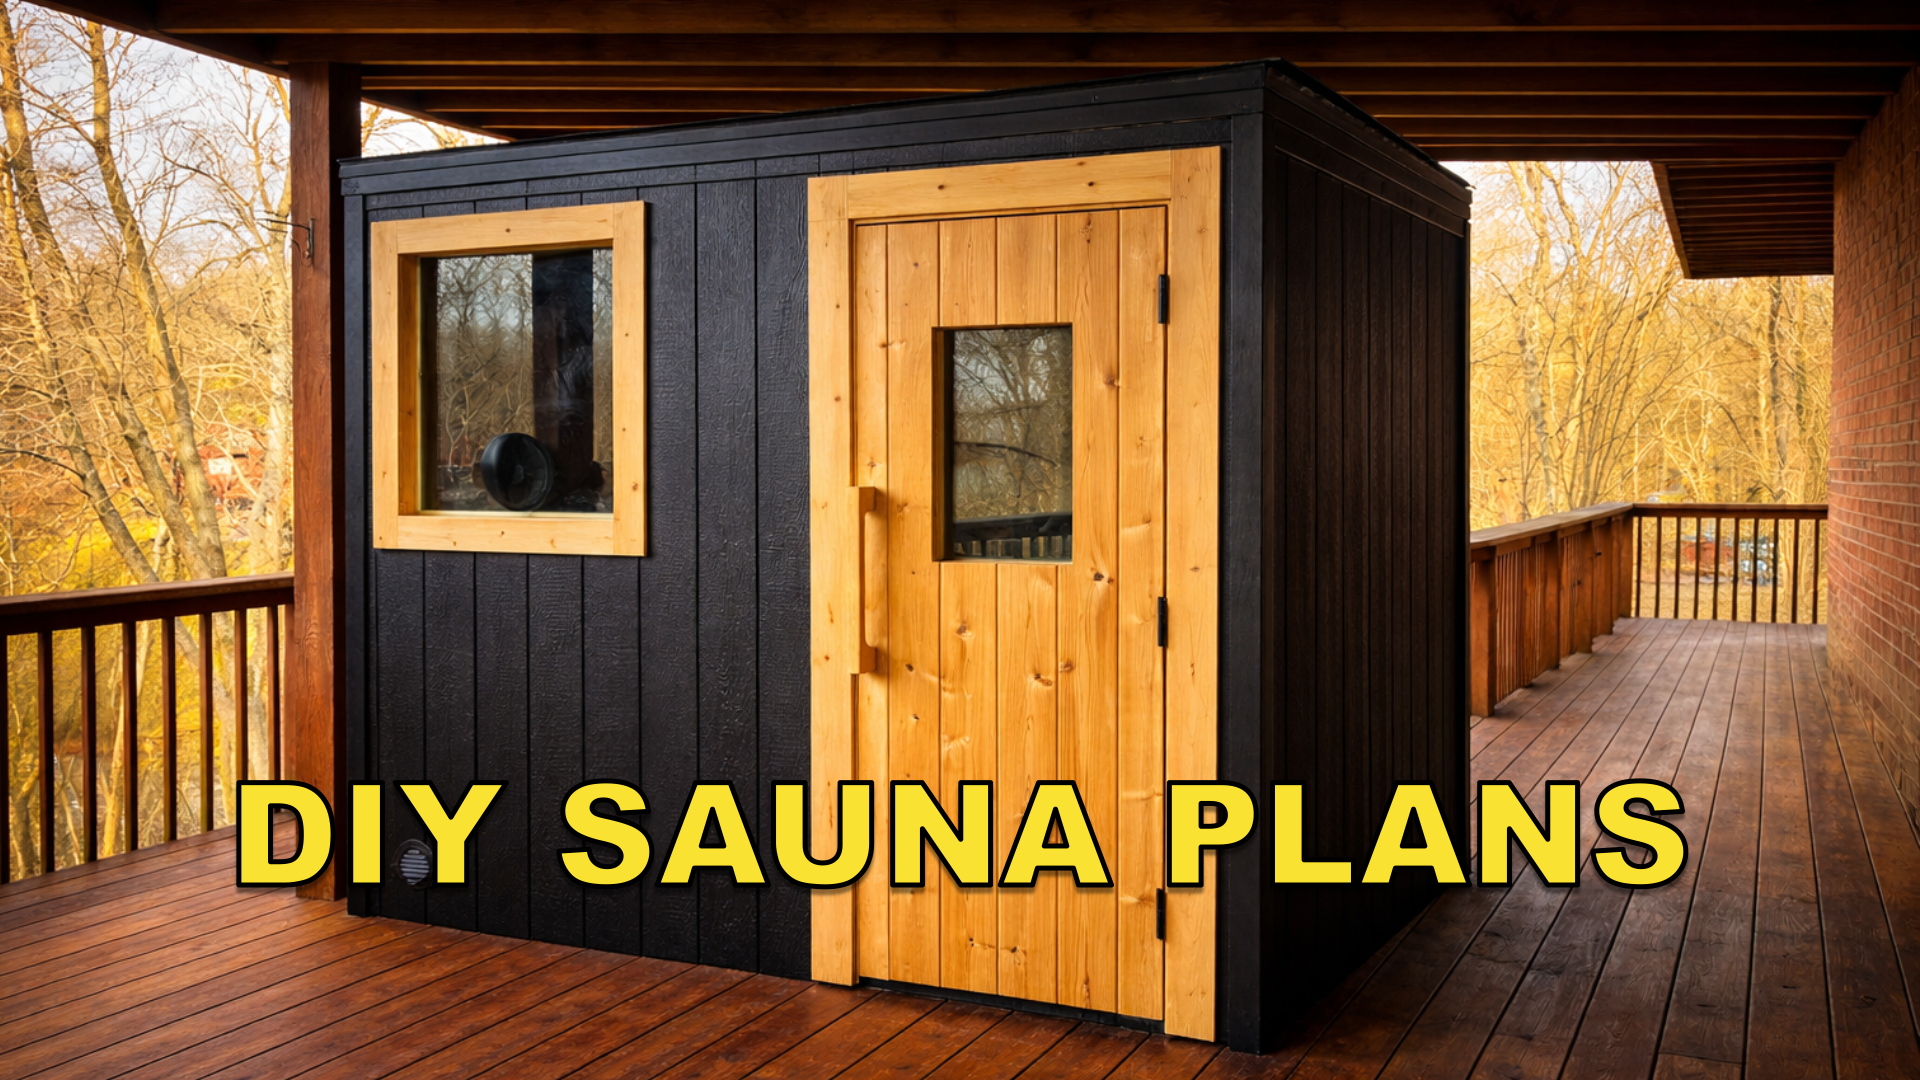
A lot of people that watched my DIY Backyard Sauna Sauna Series on YouTube asked me if they could purchase the plans. So I put two sets together that cover everything you need to make the exact same Sauna. Here they are:
6′×8′ Outdoor Sauna — Framing Plans
These are the plans I drew from building a 6′×8′ cedar sauna on my back deck. Every dimension, every cut, pulled from the as-built measurements, not generic templates.
Floor framing plan — sleeper layout @ 10″ O.C., cedar deck direction, with substitution notes for non-deck build
Back wall elevation — 96″×88″, with a California-corner detail (single corner stud + backing block) for less thermal bridging and more insulation cavity
Front wall elevation — door & window rough openings precisely dimensioned, with kings/jacks/headers/cripples all called out
Side wall elevation — slope-cut studs with exact cut lengths at every position (88″ back tapering to 79″ front)
Roof framing plan — rafters @ 16″ O.C. on edge + outer 2×4 wrap for the eave overhang
Materials & cut list — every 2×4, every fastener, with real prices from my build
You can watch how I framed this sauna using these plans step by step in this video here.
6′×8′ Outdoor Sauna Interior & Finish Plans
Phase 2 of the build, picking up where the framing leaves off. These are the actual interior decisions from my own sauna: wall buildup, bench geometry, heater placement, vent positions, all drawn from the as-built measurements.
Interior plan view — bench positions, heater corner, vent placement, door swing
Back wall interior elevation — 17 cedar boards + top exhaust vent dimensioned
Front wall interior elevation — door + window mirrored from exterior, intake vent at heater wall
Side wall interior elevation — 16 + 1 angled cedar board, heater placement with clearances, thermometer position, electrical note
Bench detail — cross-section + plan: top bench (8’×20″×44″H) + bottom bench (8’×15″×26″H) offset forward, joists 12″ O.C., 4″ cedar slats with 1″ gaps
Materials & cut list — cedar counts per wall, insulation, vapor barrier, furring, vents, heater, bench lumber
You can also buy both PDFs together: 15 pages of dimensioned drawings, materials lists, and build-tested decisions for a 6′×8′ outdoor cedar sauna. Framing through finish, drawn from an actual build on a backyard deck. Prices for lumber and hardware documented with real prices from my exact build.
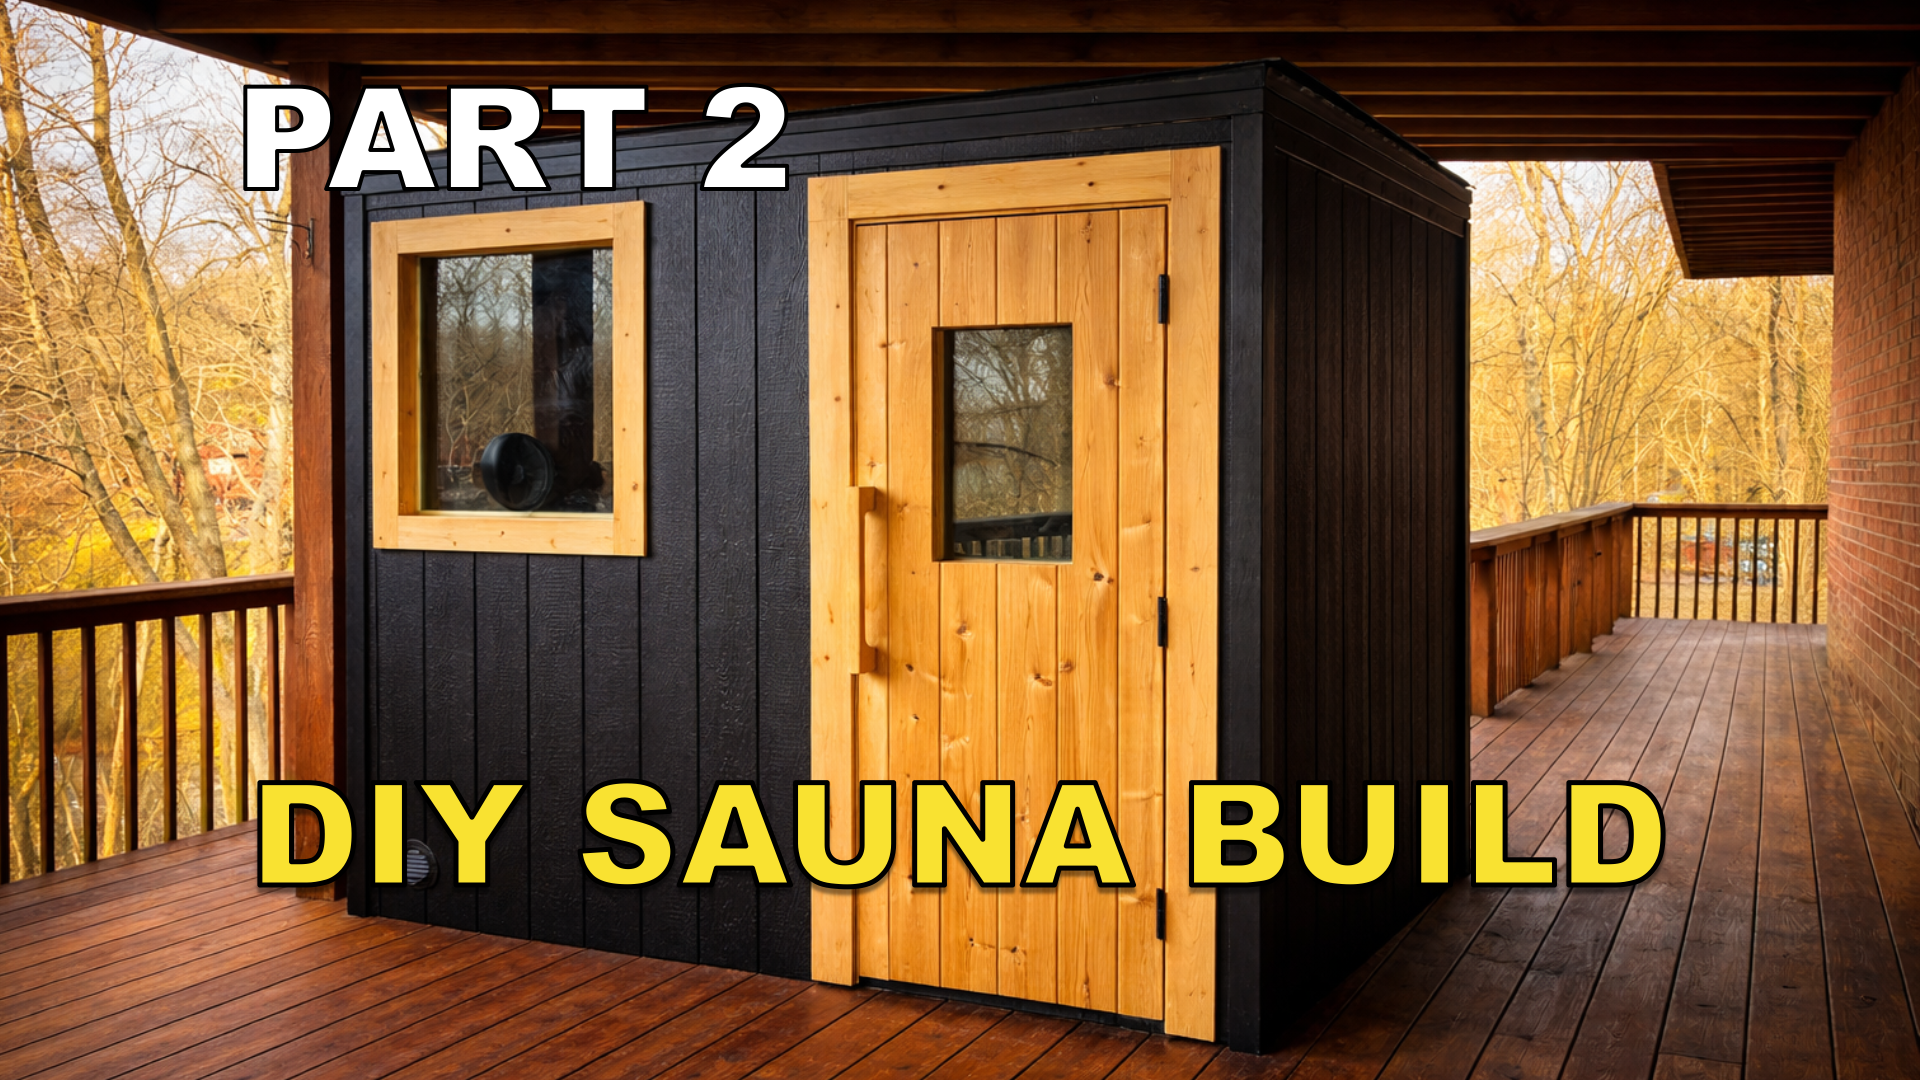
The final post in my DIY backyard sauna build series. If you missed earlier parts: Part 1 (site prep & framing), Part 2 (roof & weatherproofing), Part 3 (siding, window, ventilation), Part 4 (lighting, vapor barrier, cedar)
This is the one. The finale. Months of weekends compressed into a single episode that takes the sauna from “almost there” to “finished, fired up, and family-tested.”
It’s also the longest video in the series, because the last 20% of any build is somehow always the most work. Custom door, benches, exterior ventilation finished out, electrical run, heater installed, first sauna, and a full tour.
Here’s how it came together.
Exterior Ventilation Finished Out
I’d already framed the ventilation openings earlier in the build, but this stage was finishing them out adjustable exhaust vent cover and the intake vent. The intake sits low below the heater and adjacent to it; the exhaust sits high on the opposite wall. That layout creates a slow convection loop that keeps fresh air moving through the room without dumping heat out.
If your sauna gets stuffy, your ventilation isn’t right. Mine breathes well I can feel a gentle pull of air when the heater’s running, and when I pour water on the rocks the steam doesn’t linger, but moves over me and dissipates.
Building the Custom Door from Scratch
I saw people say this in other videos, and it’s true: building a door from scratch is not that easy.
I started by carefully measuring the doorway on all four sides, then constructed and sanded the frame before squaring it up, gluing the corners, and test-fitting it in the rough opening to make sure it would swing cleanly without rubbing. Getting a door to sit flush is a fussy process: a sixteenth of an inch in the wrong direction and it won’t close right.
Then I laid one side of the door with the same tongue and groove cedar that’s installed on the interior of the sauna, before flipping it and filling it with R15 Rockwool insulation. We don’t want any part of the sauna to be a weak spot for heat loss, so it’s important that the door has the same quality of insulation as the rest of the walls.
After that I installed my second piece of custom tempered glass that I ordered from a local glass shop, then all I needed was a handle.
The door took longer than any other single piece of this build, but it was worth it: a flimsy door would have undone everything else.
Finishing the Remaining Cedar
With the door in, I wrapped up the last of the interior cedar corners, the doorframe, and the trickier cuts around fixtures and ventilation. The hand-fitting for these last pieces takes more time than the long, easy runs do. Patience here pays off in how the finished room reads visually.
Designing and Building the Benches
Benches are where a lot of DIY saunas go sideways. Wrong height, wrong depth, wrong wood, and the room becomes uncomfortable to sit in.
A few principles I followed:
Two tiers, with the top bench tall enough that your feet are well above floor level when seated. Heat rises, and the top bench is where you actually want to sit.
Bench depth wide enough to lie down comfortably. A bench you can only sit on is a bench you’ll only use for ten minutes at a time.
Soft cedar (Western Red or Aspen-style), not regular construction cedar. The wood touches your skin. It needs to be smooth and low-resin so it doesn’t get sticky or sappy at temperature.
Top bench went in first, then the bottom bench. Testing by sitting in the unheated room felt good.
Under-Bench Lighting
This was the small touch that ended up making the biggest aesthetic difference. LED strip lighting tucked under the front edge of the top and bottom bench, washing soft light down toward the floor.
It does two things: practical (you can see where you’re stepping in a dim room) and atmospheric (it’s the difference between a wood box and a space you actually want to spend time in). It also lights the space, and not the people, which is an important element.
Running the Electrical
I covered the wiring approach in earlier episodes 50 amp circuit from the main panel to an outdoor 50 amp disconnect, 6/3 wet-rated wire to the sauna control panel, then to the heater. This stage was finishing those connections, mounting the control panel, and wiring up the heater itself.
If you’re not comfortable with this part of a build, hire it out. The electrical is the one place where “I’ll figure it out as I go” is genuinely dangerous.
Heater Test and First Sauna
Powered the heater up for the first time. Watched it climb. Threw water on the rocks for the first time and felt that wave of löyly hit the room.
It worked.
There’s a specific quality to the heat in a properly insulated, properly vented sauna with the right kind of stove that you don’t get in a prefab unit or a cheap kit. It’s softer, more even, and the steam has weight to it. That feeling is what I was chasing through this whole build, and it was there on the first burn.
Heating Theory in Practice
Sauna heat works on three fronts:
Convection — hot air rising and circulating through the room.
Radiation — direct radiant heat from the heater and stones.
Steam (löyly) — water on hot rocks creating a brief, intense spike of humidity and perceived heat.
A good sauna balances all three. Too much convection without radiation and steam, and you get a hot room that feels flat. Too much radiation, and you get scorched skin without the depth. Steam ties it all together.
Painting and Final Trim
A few exterior touches: paint where it needed paint, cedar trim to clean up the visible transitions. The kind of small finishing work that’s invisible if you do it right and impossible to ignore if you don’t.
The First Family Sauna
The whole point of this project was to have something the family could use together. The first sauna with everyone in it was the moment that made the months of weekends worth it.
The room felt right. The light was warm. The kids loved it. We talked.
This is what I built it for.
Final Thoughts on the Heater
After several weeks of regular use, a few notes on the heater I went with the Vevor 9kW 200V electric heater which is an absolute steal on Amazon at $200. Worth its own paragraph since the heater is one of the decisions DIY builders agonize over the most:
Trumpkin and most other sources go back and forth on this, and the recurring theme is that heater quality matters a lot. They’ll typically point you toward Harvia or one of the other premium brands that run anywhere from about $1,000 up to $3,000 depending on size and features. My take is that once you’ve gone electric, you’ve already stepped away from the traditional wood-fired stove, and at the end of the day the thing is really just heating a pile of rocks. For my room I probably could’ve gotten away with a 6–8 kW unit, but I oversized to 9 kW and the whole space comes up to temp in about 20 minutes — maybe 30 if it’s really cold out. And even if a component does eventually fail, I could replace this heater ten times over before I’d hit the price of a single premium one. Three or four months in, no issues, no regrets. At 9 kW for what it costs, it’s a great buy.
Sauna and Cold Plunge
I didn’t cover the cold plunge in this build, but I’ve been pairing the sauna with a cold plunge after each session. The contrast is the point. Hot, then cold, then rest. Several rounds. The energy and clarity afterward is its own kind of medicine, and it’s something I wanted built into the daily rhythm of where we live.
What This Build Taught Me
A few things I keep coming back to:
Custom always takes longer than you expect. Especially the door. Especially the door.
Don’t cheap out on the parts that matter. Vapor barrier, high-temp silicone, tempered glass, the heater. These are the things that decide whether the sauna lasts 5 years or 30.
Ventilation and insulation are 80% of whether a sauna works. Pretty cedar on the inside doesn’t matter if the wall cavity rots out behind it.
A good resource is worth its weight in gold.Trumpkin’s Notes saved me from probably ten major mistakes.
Thank You
If you’ve followed this series from the start — thank you. Sharing this build was one of the most rewarding parts of the project, and the questions and feedback in the comments made me think harder about a lot of the decisions.
If you’re starting your own build: take your time, do the boring steps right, and don’t underestimate the door.
Part 4 of my DIY backyard sauna build. If you’re just joining: Part 1 (site prep & framing), Part 2 (roof & weatherproofing), Part 3 (siding, window, ventilation).
This is the episode where the inside of the sauna stops looking like a construction site and starts looking like a sauna. The sequence — lighting wiring, vapor barrier, furring strips, cedar. This has to happen in this order, because once the cedar goes up, anything you forgot is staying forgotten.
It’s also one of the shorter episodes in the series, but the steps in it matter a lot for whether your sauna lasts 30 years or starts rotting from the inside out in 5.
Running the Lighting Electrical
Sauna lighting has to handle high temperatures and high humidity, which rules out a lot of standard fixtures. I went with a setup designed for sauna use, ran the wiring through the wall cavities before any insulation or vapor barrier went on, and left a little slack at each fixture location so I had room to work later.
A few things I’d flag for anyone doing this themselves:
Run the wire before the vapor barrier. Once the vapor barrier is up, you don’t want to be poking holes in it.
Use temperature-rated wire. Standard wire jacketing can degrade in sauna conditions. Check the rating on whatever you’re running.
Plan your switch location outside the hot room. You don’t want a standard switch on the inside of a sauna.
Ran a quick test once it was wired in to make sure everything worked before sealing it all up behind the wall.
Vapor Barrier
This is the part most non-sauna DIY guides skip or get wrong, and it’s arguably the most important step in the whole interior build.
A sauna gets hot and humid in cycles: heat up, cool down, repeat. That moisture wants to migrate out through the walls. If it gets into the insulation and stays there, you get mold, rot, and a sauna that smells wrong forever.
The fix is a foil-faced vapor barrier on the warm side of the insulation (the inside of the sauna). The foil reflects radiant heat back into the room and blocks moisture from getting into the wall cavity. Tape every seam with foil tape, not regular duct tape, which will fail.
Two rules I followed:
Continuous coverage. Walls and ceiling, every cavity, every seam taped.
Seal around penetrations. Lighting wires, ventilation openings, anything that punctures the barrier needs to be sealed back up.
This step is boring and slow. Do it right anyway.
Installing the Furring Strips
Furring strips go up over the vapor barrier, running perpendicular to the direction the cedar will run. Do not skip furring strips. It does very important things:
Creates an air gap between the vapor barrier and the cedar paneling. This gap lets any incidental moisture dry out instead of sitting against the wood and also allows the cedar to dry on both sides.
Gives you something to nail the cedar to without puncturing the vapor barrier in random places.
My colleague Tyler who also built a sauna pointed out a third benefit I hadn’t fully understood. Without an air gap, the cedar is in direct contact with the framing, so the heat in the wood conducts straight through into the studs and gets pulled into the insulation. With the air gap, the cedar can’t dump its heat into the wall instead, it re-emits the heat as infrared radiation, which the foil-faced vapor barrier reflects back into the sauna. As a result: your cedar walls stay hot, but your insulation stays cool.
I used 1×2 furring strips over each stud, fastening them with 3 inch construction screws since they would hold the whole weight of the cedar.
Installing the Cedar
This is the satisfying part. Tongue and groove cedar going up, board by board.
A few things that helped:
Start with a level reference line. If your first board isn’t level, every board after it is fighting that mistake.
Hidden-nail through the tongue. No exposed fasteners on the face of the wood.
Acclimate the cedar. Let the wood sit in the build space for a few days before installing so it adjusts to ambient humidity. Cedar that’s installed too dry or too damp can move on you.
Stagger your seams. Same as flooring, staggered seams look way better than aligned seams.
The cedar smell hit immediately. That alone made all the tedious work of the vapor barrier feel worth it.
What’s Next
Part 5 is the finale: exterior ventilation finished out, custom door built and installed, benches designed and built, electrical finished, heater installed, and the first sauna. It’s the longest episode in the series and easily the most satisfying to film.
Part 3 of my DIY backyard sauna build. If you’re just joining, start with Part 1 (site prep and framing) and Part 2 (roof, sheathing, and weatherproofing)
With the structure framed, roofed, and wrapped, it was time to start turning the sauna from “box that looks like a shed” into something that actually functions as a sauna. Part 3 is where that shift starts — I got the exterior siding on, installed the custom glass window, worked through the ventilation system, and started prepping for the electrical.
Ventilation ended up being the piece I researched the most, and honestly it’s the part of a sauna build I see people mess up the most online. So I’ll spend some time on it here.
Cutting the Door Opening and Installing the Front Siding
Before siding went on, I had to cut the rough opening for the door through the sheathing and house wrap. Pretty straightforward — measure twice, cut once, and keep the cut as clean as possible because the trim will cover small mistakes but not big ones.
From there, the front siding went up. I worked off the top, keeping a consistent reveal between boards.
Ventilation Theory (The Part Most DIY Saunas Get Wrong)
A sauna isn’t just a hot box. For it to actually work — meaning the heat stays where bodies are, humidity moves correctly, and you don’t suffocate — you need air moving in a deliberate way.
The short version of what I landed on:
Intake goes low, near the heater, so fresh air gets pulled up through the stones and into the room at temperature.
Exhaust goes on the opposite wall, ideally placed to encourage a slow convection loop rather than dumping hot air out the top.
You want air turnover without killing the heat — maybe 4–6 air changes per hour depending on the source.
Like I mentioned in the videos, I based my setup largely on Trumpkin’s Notes on Building a Sauna, which is the most useful free resource I found on this topic. If you’re planning a build, read it before you frame anything.
Exterior Trim and Caulking
Trim went on after the siding — corners, around the window, around the door opening. Not complicated but the kind of detail work that either looks great or looks off, depending on how patient you are with it.
Then came caulking every seam that would see weather. Use an exterior-grade product rated for the temperature swings in your area. Cheap caulk cracks in a year or two and then you’re chasing leaks.
The Custom Glass Window
This was the moment I was most nervous about in the whole build. I had a custom tempered glass panel made at a local glass shop based on the rough opening dimensions I’d framed in Part 1. Tempered is non-negotiable here — regular glass near sauna temperatures is dangerous.
When it arrived, I dry-fit it first without any sealant just to make sure the opening was right. It was — barely. A snug fit on the right and left side and about a 2 inch gap on top that required additional framing to close that opening.
Then I framed the opening with cedar stops, applied a bead of high-temp silicone (the red stuff — rated for 500°F+), set the glass, and locked it in with the interior stops. High-temp silicone is the right call here. Standard silicone will off-gas or degrade at sauna temperatures.
Prepping for Electrical
With the exterior buttoned up, I started prepping for the electrical run. I’ll cover the actual wiring in Part 4, but at this stage it was mostly about locating the control panel, thinking through the conduit path, and making sure everything I’d need was on hand before I opened anything up.
What I’d Do Differently
A couple of lessons from this stage:
Dry-fit the glass panel the moment it arrives. If something’s off, you want to know before you’ve committed to sealants and trim.
Don’t skimp on high-temp silicone. It’s $10 more than the regular tube and it’s the difference between a window that lasts and one that fails in a year.
Plan your ventilation before you frame, not after. I got lucky that my placements worked out, but if I were doing it again I’d mark the exact intake and exhaust locations during framing.
What’s Next
Part 4 is a short video covering the lighting electrical, vapor barrier, and installing the furring and the first part of the actual interior cedar. Part 5 is finishing the sauna, and using it!
Part 2 of my DIY backyard sauna build is here! In this episode I get the sheathing up, build and install the roof, wrap the whole structure in Tyvek, install hurricane ties, insulation, and flash the window and door openings.
This was the stage where the sauna finally started to look like an actual building and where a few small mistakes (looking at you, drip edge) taught me some lessons I wish I’d learned before starting.
Part 1 is here with parts 3, 4, and 5 coming in the next few days.
I spent the last several months designing and building a sauna from scratch in my backyard and finally started posting the build on YouTube. Part 1 is live! It covers the background, site prep, and framing.
Key things covered:
– Why I decided to build instead of buy
– Site preparation
– Base frame construction
– Wall framing and layout
Part two is also already live with the rest coming in the following days.
This past weekend I decided to modify the stock exhaust on my motorcycle in order to get a better sound and let the V-Twin on the bike breathe a little better.
I made a short video showing how. You only need one tool 🙂