Category: Software

  • I Built a Menu Bar App That Turns My Wife’s Texts Into Calendar Events

    I Built a Menu Bar App That Turns My Wife’s Texts Into Calendar Events

    My day is a wall of notifications.

    IRC, Slack, Discord, P2s, Adium jabber alerts, ntfy.sh pings, Telegram, WhatsApp, iMessage. I have thousands of streams of text coming at me every single day. It’s just ping ping ding ding ding from the moment I open my laptop until I close it.

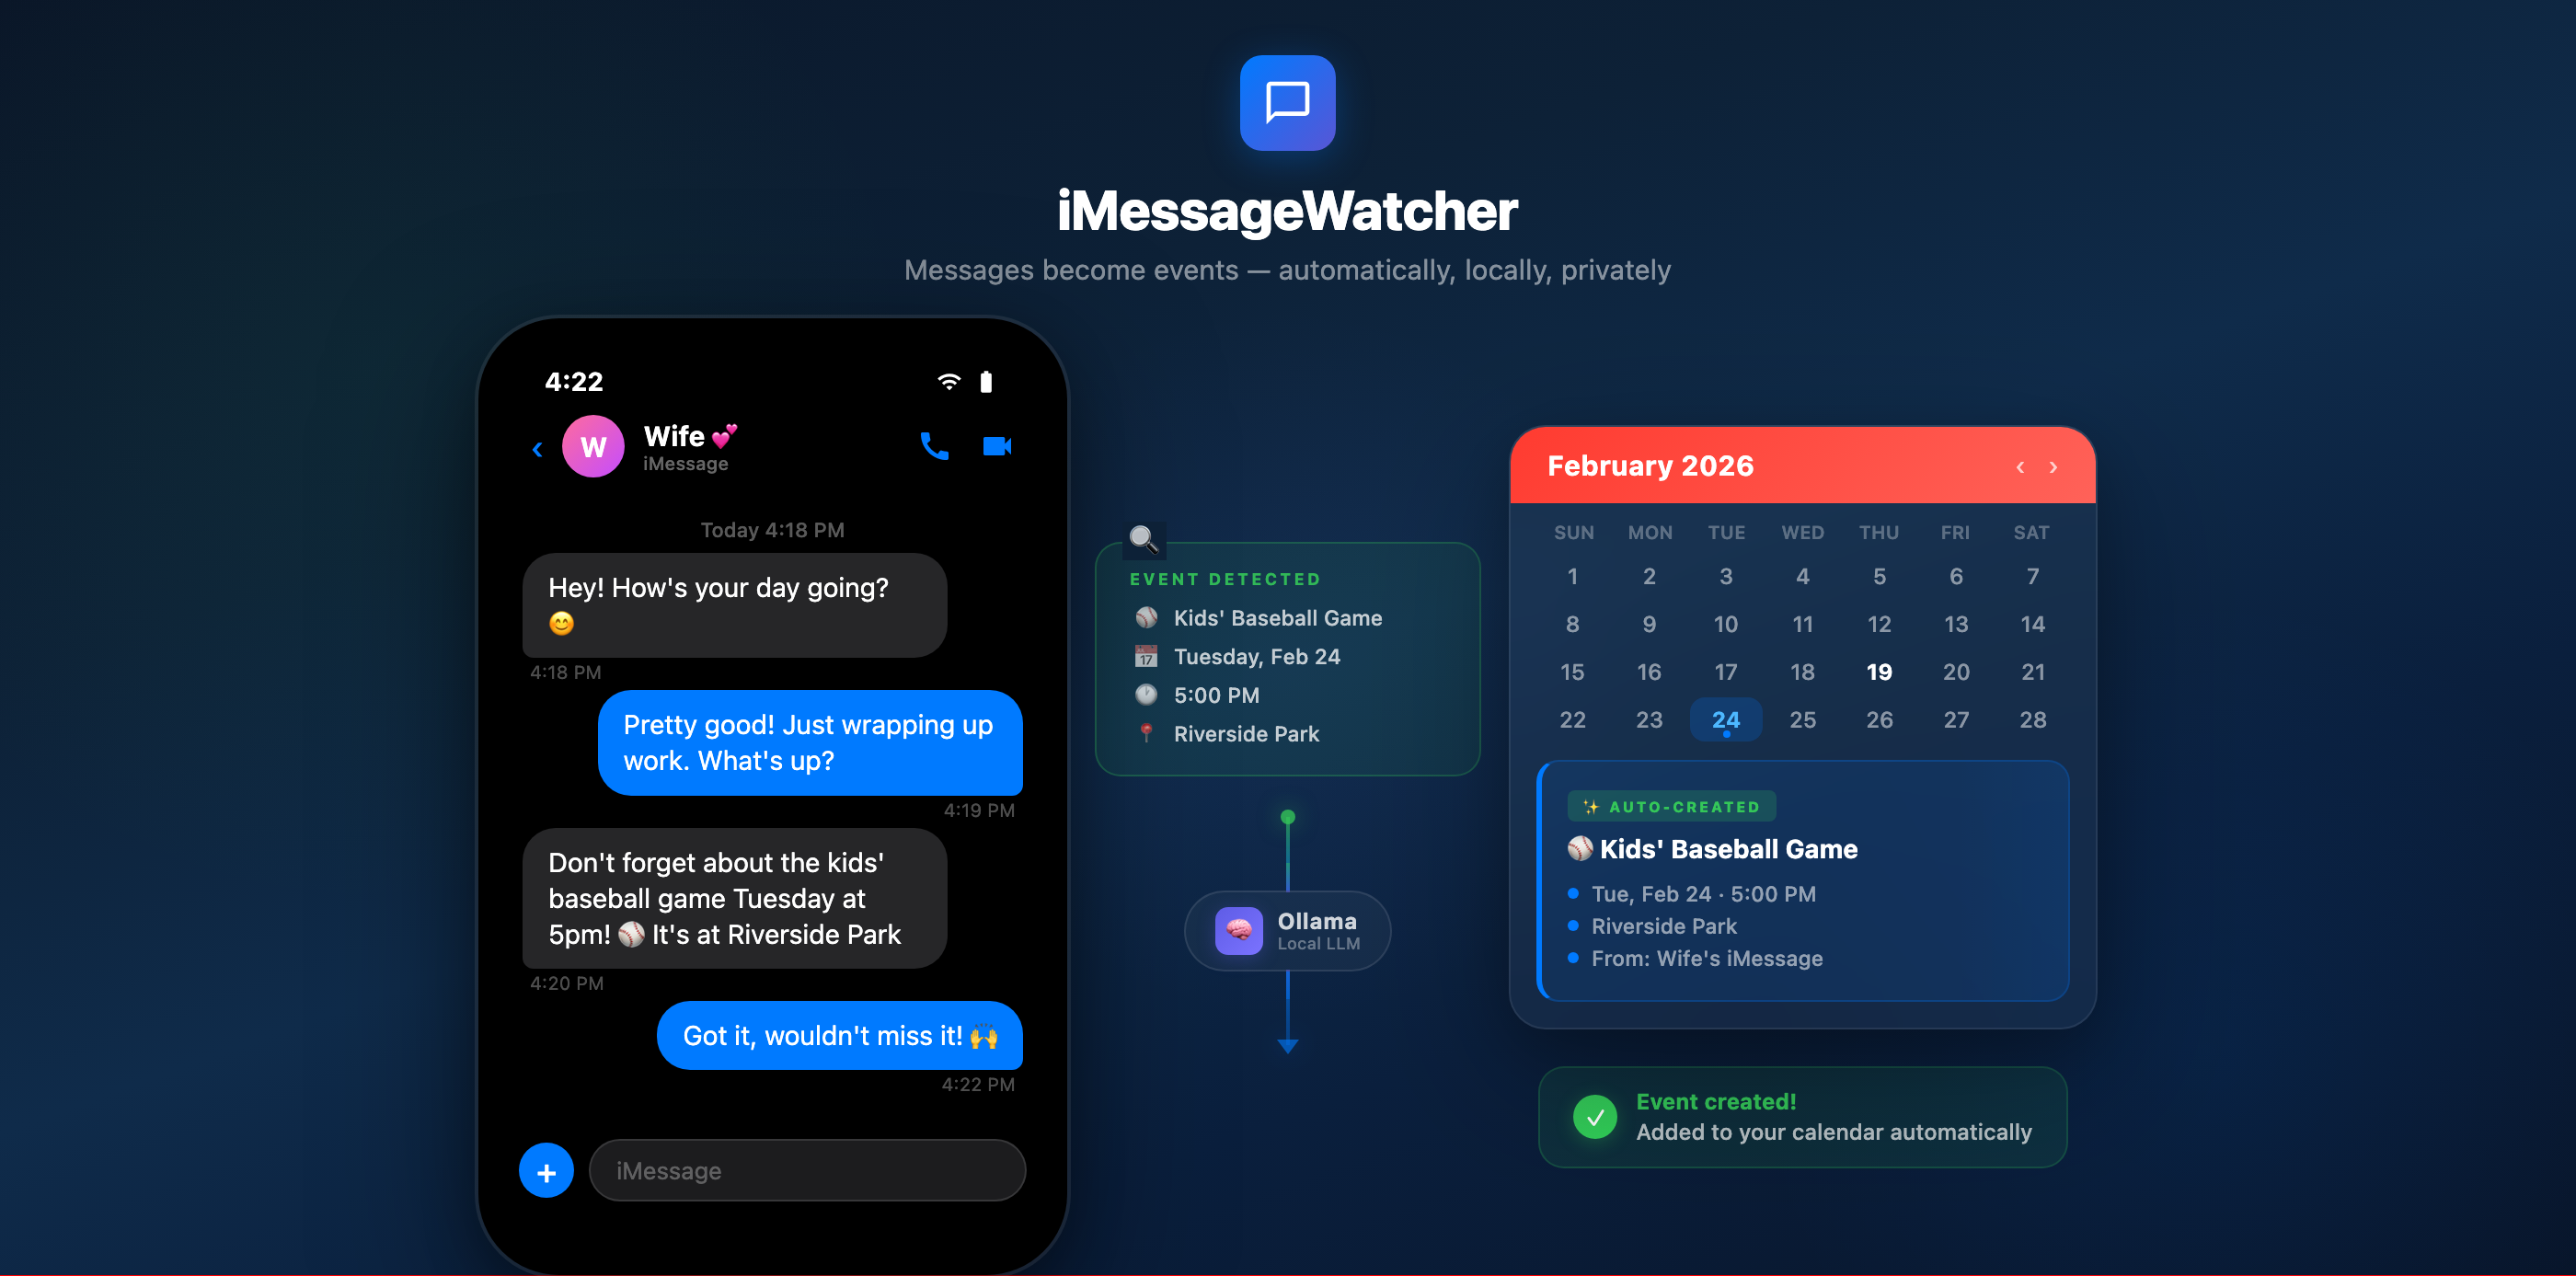
    And somewhere in that noise, my wife texts me that the kids have a baseball game Tuesday at 5pm at Riverside Park.

    She’s incredibly organized. She texts me about dates, plans, appointments, school events, family stuff. All the time. And she’s great about it. The problem is me. I’m neck deep in a Kubernetes migration or chasing a kernel bug, and by the time I come up for air, that text is buried under 47 Slack threads and a Discord ping about someone’s homelab.

    So I built something to fix it.

    iMessageWatcher

    Screenshot of iMessageWatcher app showing a conversation about a kids' baseball game scheduled for February 24, 2026, with event details added to the calendar.

    iMessageWatcher is a macOS menu bar app that watches my iMessages specifically from my wife and uses a local LLM to figure out if a message contains an event, a date, a reminder, or something I need to act on. If it does, the app automatically creates a calendar event with the name, location, time, and all that. No input from me. No copy-pasting. No “I’ll add that later” (which means never).
    The whole thing runs locally. The LLM runs on my machine through Ollama. My wife’s messages never leave my device, never hit a cloud API, never get sent to OpenAI or anyone else. That was non-negotiable for me.

    How It Works

    The app sits in your menu bar and polls the iMessage database (~/Library/Messages/chat.db) every 60 seconds. It watches for new messages from whichever contact you configure (in my case, my wife’s number).

    Flowchart illustrating how iMessageWatcher processes text messages into calendar events on a device, showing steps from iMessage database to classification and extraction by Olama LLM, leading to integration with Calendar, Reminders, Due App, and ntfy.sh.

    When it finds new messages, it grabs the recent conversation context and sends it to a local Ollama instance running deepseek-r1 (or whatever model you prefer). The LLM gets a prompt that basically says: “Look at this conversation. Is there an event, appointment, or task mentioned? If so, extract the name, date, time, and location. Return JSON.”

    The app parses the response and creates the event in Apple Calendar. Done. My wife texts “Don’t forget about the kids’ baseball game Tuesday at 5pm, it’s at Riverside Park” and a few seconds later, “Kids’ Baseball Game” shows up on my calendar for Tuesday at 5:00 PM at Riverside Park. I don’t touch anything.

    It also works with Apple Reminders, the Due app (a personal favorite reminder app), and ntfy.sh for push notifications. You can toggle each one on or off depending on your setup.

    The Entire App Is 4 Files!!!1

    This is probably my favorite part. The whole thing is 4 files with no Xcode project and no external dependencies:

    Overview of the app structure, featuring four key files: main.swift as the entry point, AppDelegate.swift for application logic, Info.plist for metadata, and build.sh for compilation. Each file includes brief descriptions of its functionality.
    • main.swift : App entry point. 5 lines.
    • AppDelegate.swift : All the logic. Menu bar, SQLite scanning, LLM classification, EventKit integration, preferences window. Everything.
    • Info.plist : Bundle metadata and permission descriptions.
    • build.sh : Compiles the app, generates the icon programmatically, bundles everything into a proper .app.

    No CocoaPods. No Swift Package Manager. No Xcode project file. You clone the repo, run ./build.sh, and you have a working macOS app. The build script even generates the app icon using Core Graphics in an inline Swift script. I love that kind of simplicity.

    The compilation is just a single swiftc call:

    swiftc -O main.swift AppDelegate.swift \
    -framework Cocoa \
    -framework EventKit \
    -lsqlite3

    That’s it. Two Swift files, three frameworks, one binary.

    Why Local LLM

    I thought about this a lot. I could have used OpenAI’s API or Claude’s API and gotten better classification accuracy out of the box. But these are my wife’s text messages. They contain personal details about my kids, our schedules, where we’ll be and when. I’m not sending that to a third party.

    Ollama makes this easy. You install it, pull a model, and you have a local inference server running on localhost. The app just makes HTTP requests to http://localhost:11434. Everything stays on my machine.

    The classification accuracy with deepseek-r1 is honestly great for this use case. It’s not trying to write poetry. It’s looking at a text message and deciding “is this an event or not” and pulling out structured data. Local models handle that just fine.

    The SQLite Trick

    iMessage on macOS stores everything in a SQLite database at ~/Library/Messages/chat.db. The app reads it directly using the SQLite3 C API (no ORMs, no wrappers, just raw queries). It tracks which messages it’s already processed using ROWIDs so it never creates duplicate events.

    You do need Full Disk Access enabled for the app since chat.db is in a protected directory. The app checks for this on launch and walks you through enabling it if needed.

    What It Actually Catches

    Here’s the kind of stuff that used to slip through the cracks and doesn’t anymore:

    • “Soccer practice moved to Thursday at 4:30”
    • “Dentist appointment for the kids next Wednesday at 2”
    • “My mom is coming over Saturday around noon”
    • “Can you take and pick up the kids from school tomorrow?”
    • “I’m traveling for a work event the second week of April to Houston” (Yes it will do a multi day entry accurately”
    • “Don’t forget we have that dinner thing Friday at 7, it’s at that Italian place downtown”

    The LLM is good at parsing casual language. My wife doesn’t text in calendar-event format. She texts like a normal person. And the model handles it.

    Try It

    The repo is at github.com/rfaile313/iMessageWatcher. Clone it, run ./build.sh, configure your contact, and you’re done.

    You’ll need:

    • macOS 14+
    • Ollama installed and running
    • Full Disk Access for the app
    • Calendar and Reminders permissions

    It’s free, it’s open source, and your data never leaves your machine. If you’re someone who drowns in notifications and occasionally misses the important stuff from the people who matter most, this might help.

    It definitely helped me stop being the guy who forgets about Tuesday at 5pm.

  • What Happens When You Move 1,000 Servers to cgroup v2

    What Happens When You Move 1,000 Servers to cgroup v2

    We’ve been running a large-scale Kubernetes cluster on Scientific Linux 7 for years. It works. It’s stable. Nobody complains. So naturally, we decided to migrate everything to Debian 12.

    I’m leading this migration at Automattic, and it involves moving over a thousand servers to a completely new OS stack. New kernel, new cgroup version, new assumptions about how your containers actually use resources. The goal is straightforward: modern infrastructure, better tooling, fewer surprises down the road.

    The surprises showed up immediately.

    The Problem Nobody Warns You About


    cgroups are the Linux kernel feature that controls and limits how much CPU, memory, and other resources a process can use.

    Here’s the thing about cgroup v1 (the old way): CPU limits are soft. If your container says it needs 2 CPUs but the host has 16 CPUs sitting idle, the kernel lets your container burst way past its limit. Everyone’s happy. Your monitoring looks clean. Your apps run fine.

    cgroup v2 (the new way) doesn’t do that. CPU limits are hard. You asked for 2 CPUs? You get 2 CPUs. Doesn’t matter if the host is 80% idle. The CFS quota enforcer will throttle your container the moment it tries to exceed its allocation.

    This distinction matters a lot more than it sounds like.

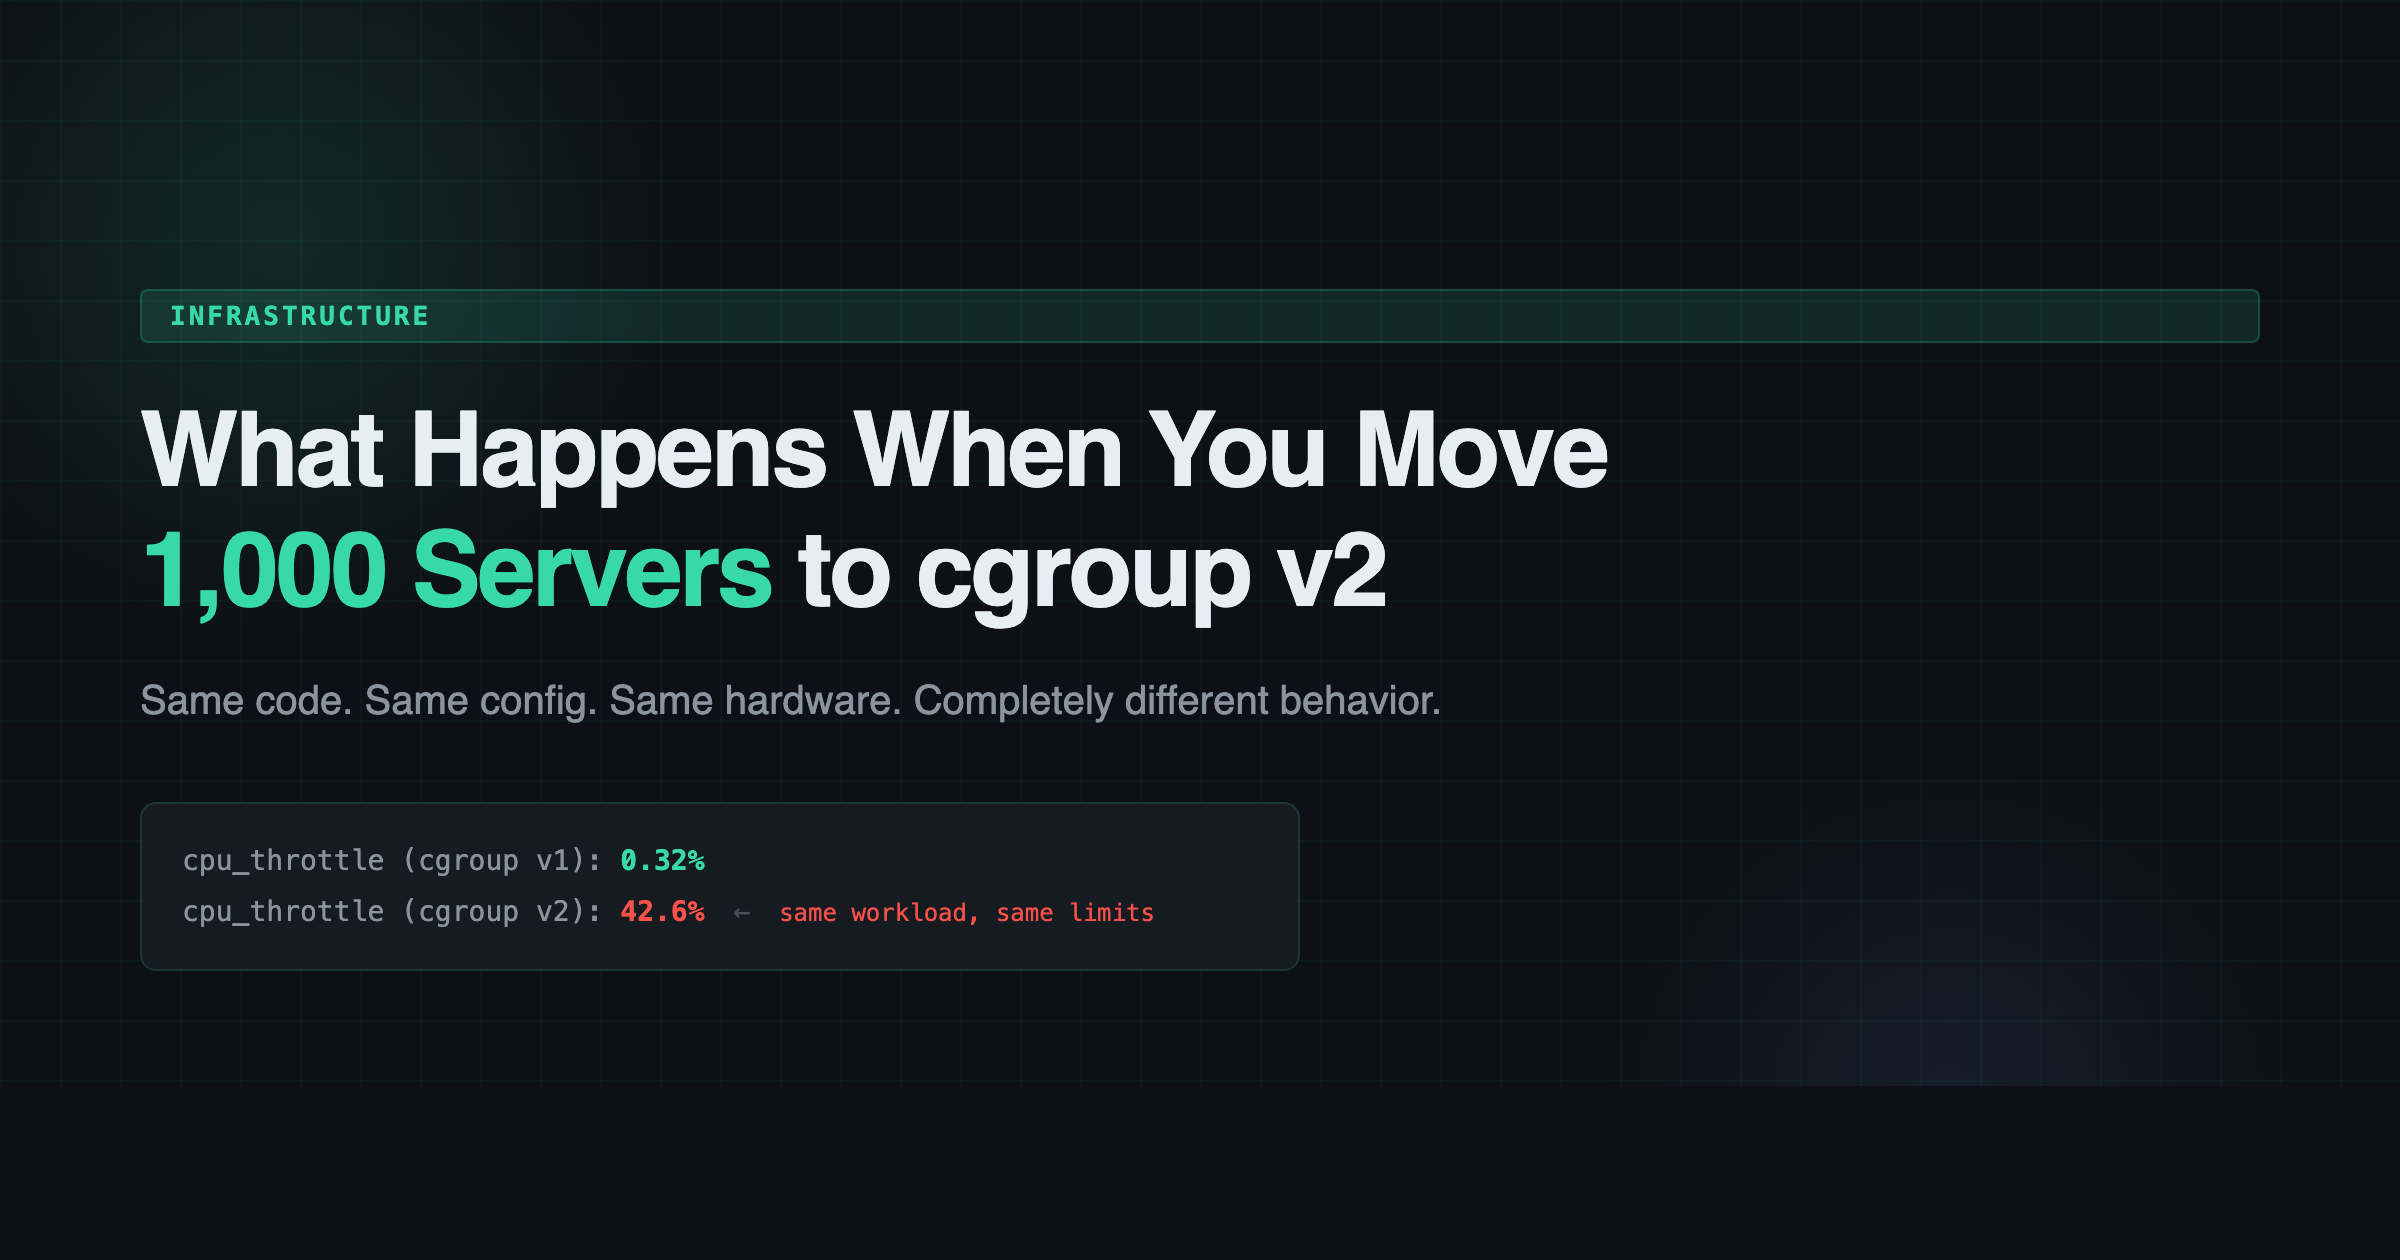
    Comparison of CPU throttle rates between cgroup v1 (Scientific Linux 7) and cgroup v2 (Debian 12), showing respective rates of 0.32% and 42.6%, along with syn drops and queue overflows.

    0.32% to 42.6%

    We had an nginx ingress controller handling external traffic for hundreds of millions of requests. The config was simple: 4 nginx workers, 2 CPU limit. On Scientific Linux 7, the throttle rate was 0.32%. Basically nothing. Health checks passed. Latency was fine. Life was good.

    On Debian 12 with cgroup v2, the same config produced a 42.6% throttle rate. The host CPU was 76.9% idle. Plenty of headroom. But the container couldn’t touch it.

    Here’s what happened in sequence:

    1. 4 nginx workers competing for 2 CPUs worth of quota
    2. Workers hit the CFS bandwidth limit and get throttled
    3. Throttled workers can’t call accept() fast enough
    4. TCP listen backlog (default 511) overflows
    5. Kernel starts dropping SYN packets
    6. Health checks time out
    7. Pod restarts

    Same code. Same config. Same hardware. Completely different behavior.

    It Wasn’t Just Nginx

    Once we started looking, the pattern was everywhere. Workloads that had been “fine” for years were suddenly gasping for air:

    • A core platform service: 99% throttled
    • A search task manager: 100% throttled in prod, 99% in dev
    • A log pruning job: 100% throttled
    • Stream processing workers: 97-100% at their memory limits
    • Various sidecars (auth proxies, metrics exporters): 95-100% memory utilization

    None of these had ever raised an alert on Scientific Linux 7. They were all quietly bursting past their stated limits, and nobody knew because nobody had a reason to look.

    The Fix

    The fix itself is boring. Bump the CPU limit to match the actual workload. For the nginx ingress, we went from 2 to 8 CPUs (2 per worker). Throttle rate dropped to 0.4%. Health checks passed. Done.

    The interesting part is the discovery process. You can’t just do a blanket “double all the limits” because some workloads genuinely don’t need more. You have to look at each one, understand what it’s actually doing, and set appropriate limits based on real usage instead of inherited guesses from three years ago.

    We ended up writing a tracker script that generates tab-separated output we could paste into a spreadsheet. For each workload: current CPU request, current limit, actual throttle rate, memory utilization. Sort by throttle rate descending. Start at the top and work your way down.

    The Lesson

    If you’re planning a migration from an older Linux distribution to something running cgroup v2 (which is basically everything modern at this point: Debian 12+, Ubuntu 22.04+, Fedora, RHEL 9), here’s what I’d tell you:

    Audit your resource limits before you migrate, not after. Every container that’s been happily bursting on cgroup v1 is going to get a rude awakening on v2. The workload hasn’t changed. The enforcement has.

    Run something like this on your current cluster:

    # Check container CPU throttle rates
    kubectl top pods --containers -A | sort -k4 -rn | head -20

    Or better yet, if you have Prometheus:

    rate(container_cpu_cfs_throttled_periods_total[5m])
    /
    rate(container_cpu_cfs_periods_total[5m])
    * 100

    Anything above 10-15% is a candidate for a limit bump. Anything above 50% is going to have a bad time on cgroup v2.

    The Bigger Picture

    This was just one of the problems we hit during the migration. There were kernel regressions that spawned 8,000+ kworkers and pegged a node at load 8,235 for 46 minutes. There were firewall rule asymmetries that broke cross-node metrics scraping. There were StatefulSet race conditions where Kubernetes would grab the wrong persistent volume if you weren’t fast enough.

    Each one of those is its own story. But the cgroup v2 throttling issue is the one I think most people will run into first, and it’s the easiest to miss because everything looks fine until it suddenly doesn’t.

    The migration is still ongoing. Over a thousand servers, hundreds of stateful workloads, and a lot of tar pipes between machines that can’t SSH to each other. I’ll write more about it as we go.

    If you’re doing something similar, I’d love to hear about it. Hit me up on Twitter/X or LinkedIn.

  • Claude is kind of good

    Claude is kind of good

    Image credit @fireship / TheCodeReport on YT.

    A few months ago I wrote about how Claude failed to build a simple macOS menu bar application. After burning through $5 in API credits and multiple sessions, it eventually gave up and suggested I reset my NVRAM. GPT-4o built it on the first try.

    I still think that critique was fair. But I’ve started using Claude Code for the past few weeks after all the opus 4.5 hype, and I need to update my assessment: Claude is actually pretty good.

    I used it to re-write crapslesscraps.com from scratch, and I am very pleased with the results. Here is the before & after:

    Before

    Screenshot of the Crapless Craps game interface, displaying a virtual betting table, current bank amount, and options to roll dice. The table features various betting options with a vibrant green background.

    After

    Screenshot of the Crapless Craps game interface showing the betting options and game controls.

    In addition to looking way better, I went from this insanely complex project for something so simple:

    .
    ├── assets
    │   └── initial.png
    ├── eslint.config.mjs
    ├── next-env.d.ts
    ├── next.config.ts
    ├── out
    │   ├── _next
    │   │   ├── qZpjdeMzF2EBa0T0miGAH
    │   │   └── static
    │   │       ├── chunks
    │   │       │   ├── 4bd1b696-1962bfe149af46cd.js
    │   │       │   ├── 684-80ddbd5c2fee50a3.js
    │   │       │   ├── 748-170506f584844847.js
    │   │       │   ├── app
    │   │       │   │   ├── _not-found
    │   │       │   │   │   └── page-6bf1735bae9e04ee.js
    │   │       │   │   ├── layout-bb587b94ee6256a7.js
    │   │       │   │   └── page-b1329367083c88ad.js
    │   │       │   ├── framework-f593a28cde54158e.js
    │   │       │   ├── main-477a2845a0a3ba6c.js
    │   │       │   ├── main-app-cb108c2984af81c8.js
    │   │       │   ├── pages
    │   │       │   │   ├── _app-da15c11dea942c36.js
    │   │       │   │   └── _error-cc3f077a18ea1793.js
    │   │       │   ├── polyfills-42372ed130431b0a.js
    │   │       │   └── webpack-f029a09104d09cbc.js
    │   │       ├── css
    │   │       │   └── 643c490fd7af8faf.css
    │   │       ├── media
    │   │       │   ├── 4cf2300e9c8272f7-s.p.woff2
    │   │       │   ├── 747892c23ea88013-s.woff2
    │   │       │   ├── 8d697b304b401681-s.woff2
    │   │       │   ├── 93f479601ee12b01-s.p.woff2
    │   │       │   ├── 9610d9e46709d722-s.woff2
    │   │       │   └── ba015fad6dcf6784-s.woff2
    │   │       └── qZpjdeMzF2EBa0T0miGAH
    │   │           ├── _buildManifest.js
    │   │           └── _ssgManifest.js
    │   ├── 404
    │   │   └── index.html
    │   ├── 404.html
    │   ├── about.txt
    │   ├── android-chrome-192x192.png
    │   ├── android-chrome-512x512.png
    │   ├── apple-touch-icon.png
    │   ├── favicon-16x16.png
    │   ├── favicon-32x32.png
    │   ├── favicon.ico
    │   ├── file.svg
    │   ├── globe.svg
    │   ├── icon.svg
    │   ├── index.html
    │   ├── index.txt
    │   ├── next.svg
    │   ├── playonlinefree.png
    │   ├── site.webmanifest
    │   ├── vercel.svg
    │   └── window.svg
    ├── package-lock.json
    ├── package.json
    ├── postcss.config.mjs
    ├── public
    │   ├── about.txt
    │   ├── android-chrome-192x192.png
    │   ├── android-chrome-512x512.png
    │   ├── apple-touch-icon.png
    │   ├── favicon-16x16.png
    │   ├── favicon-32x32.png
    │   ├── favicon.ico
    │   ├── file.svg
    │   ├── globe.svg
    │   ├── icon.svg
    │   ├── next.svg
    │   ├── playonlinefree.png
    │   ├── site.webmanifest
    │   ├── vercel.svg
    │   └── window.svg
    ├── README.md
    ├── src
    │   ├── app
    │   │   ├── globals.css
    │   │   ├── layout.tsx
    │   │   └── page.tsx
    │   ├── components
    │   │   ├── AnimatedBankroll.tsx
    │   │   ├── AuthenticCrapsTable.tsx
    │   │   ├── ChipClearAnimation.tsx
    │   │   ├── CrapsTable.tsx
    │   │   ├── DiceAnimation.tsx
    │   │   └── WinDisplay.tsx
    │   ├── contexts
    │   │   └── UserContext.tsx
    │   └── lib
    │       ├── game-logic.ts
    │       └── sound-manager.ts
    ├── tsconfig.json
    └── tsconfig.tsbuildinfo
    
    20 directories, 79 files

    ^ that’s before node_modules which added an additional 1949 directories and 22,781 files (lol):

    1969 directories, 22860 files

    to this:

    .
    ├── favicon.ico
    ├── index.html
    ├── public
    │   ├── apple-touch-icon.png
    │   ├── favicon-16x16.png
    │   ├── favicon-32x32.png
    │   ├── favicon.ico
    │   └── icon.svg
    └── README.md
    

    A favicon, and an 800 line html file that spits in the face of every flavor of the month javascript framework. I love it.

  • crapslesscraps.com

    crapslesscraps.com

    I recently returned from a work trip in Las Vegas, Nevada. I’ve always enjoyed playing live craps, but I discovered a new fondness for bubble craps, specifically the crapsless variant. If you aren’t familiar with craps in general it’s the famous game where everyone stands around a table and make bets on numbers while one of the players, called The Shooter, rolls the dice.

    A lively crowd gathered around a craps table in a casino, with players engaged in the game and a dealer presenting the dice.

    A lot of folks shy away from craps because they find the game confusing, but it really isn’t. At its core, it’s just making bets on the outcome of the dice roll, which can be any number between 2 and 12. As there are the most ways (6) out of 36 possible outcomes on two die to make 7, it is the most commonly rolled number. On a regular craps table, the way most people play is on the Pass line. On the pass line, 7 or 11 wins on the first phase of the game or the “come out” roll, while rolling a 2, 3, or 12 loses. Any other number becomes the point. From then on, the goal is to roll the point number again before rolling a 7. That’s it.

    So now that you’re a craps expert, crapsless craps is basically the same game except 2, 3, and 11, 12 can also be points. That’s really it. If you roll one of those numbers on the come out, they become the point, and you’re trying to roll the point number again before a 7.

    Like I mentioned above though, craps is just making bets on the outcome of the dice roll. So you don’t have to play that way. You can bet on any single number, multiple numbers, all the numbers, or even that all the low numbers or all the high numbers, or all the numbers that are not 7 will roll before a 7 appears (called the ATS bet) which I managed to hit during my business trip on the last night I was there:

    Display screen showing a hand pay amount of $3,006.89 for a craps game with betting options for low rolls, high rolls, and 'Roll'em All' on a green background.

    Anyway, when I got back home I wanted to play more, just for fun with play money. I looked, and there are different craps games I found online, but no crapsless craps! So I decided I would just write the game myself from scratch using some new frameworks while having an opportunity to test out some different AI tools and development patterns. Whenever I do this kind of stuff, I always have a strong instinct to make whatever I end up making available to other people, free of charge and free of ads or anything like that, just like other tools I’ve built for myself like my 5/3/1 workout program generator or any of the little games I made like Draw! or Lucy’s Adventure (Speaking of Lucy, my dog the game was named after, passed away 2 weeks ago at 16.5 years old 🥲).

    A dog sitting in a car, looking happy with its tongue out, next to a red water bottle.
    👼

    Anyway, I found the domain crapslesscraps.com was unregistered so I registered it then set up an auto deploy pipeline for merges to my master branch in version control to deploy the game there:

    Screenshot of the online Crapless Craps game interface showing dice rolling area, betting options, and player bank balance.

    So, if you like craps or want to learn more about it by playing online with play money, there is now a crapsless variant available for free at crapslesscraps.com 😊. If you have feedback for me about the game or find a bug, feel free to contact me.

  • What I’m using

    What I’m using

    One of the challenges of working remotely is that you lose the benefit of “over-the-shoulder” learning. You don’t get to see what tools your coworkers are using or pick up on small productivity hacks just by being near them. So, I wanted to write this post to share some of the stack and software I use every day – my daily drivers – in hopes that it might help someone else out there level up their workflow or solicit feedback on what you are using and level up mine 🙂

    Basic Stack

    I use a 16″ Macbook Pro with an M3 chip (48G RAM/1TB SSD) as my primary work machine. I find Macs to be unparalleled in laptop user experience. The keyboard is excellent, the trackpad second to none, the display is great, and the fingerprint reader integrating with everything is an awesome bonus.

    I used to be a guy that had to have a “command center” – multiple monitors, a fancy mechanical keyboard, an expensive mouse, and everything arranged just so. But I found that I lost a little productivity if I was at a meetup, traveling, in a data center, or really doing anything except being in my command center. I just accepted this – I’m less productive when I’m not at home.

    Then I talked to a colleague, Demitrious Kelly one late night, and he was telling me about how he only uses his MacBook because “it’s the tool I always have”. This statement caught me completely off guard, because I expected someone like him to have a crazy setup to produce the kind of work he does – tiene mucho talento. But he challenged me to try using only the Mac.

    That was about six years ago, and I’ve exclusively used my MacBook for work since then with nothing else, no peripherals. Since then, it doesn’t matter if I’m at home, on a plane, at a conference, or in a car – my output is the same. That simple statement revolutionized the way I work:

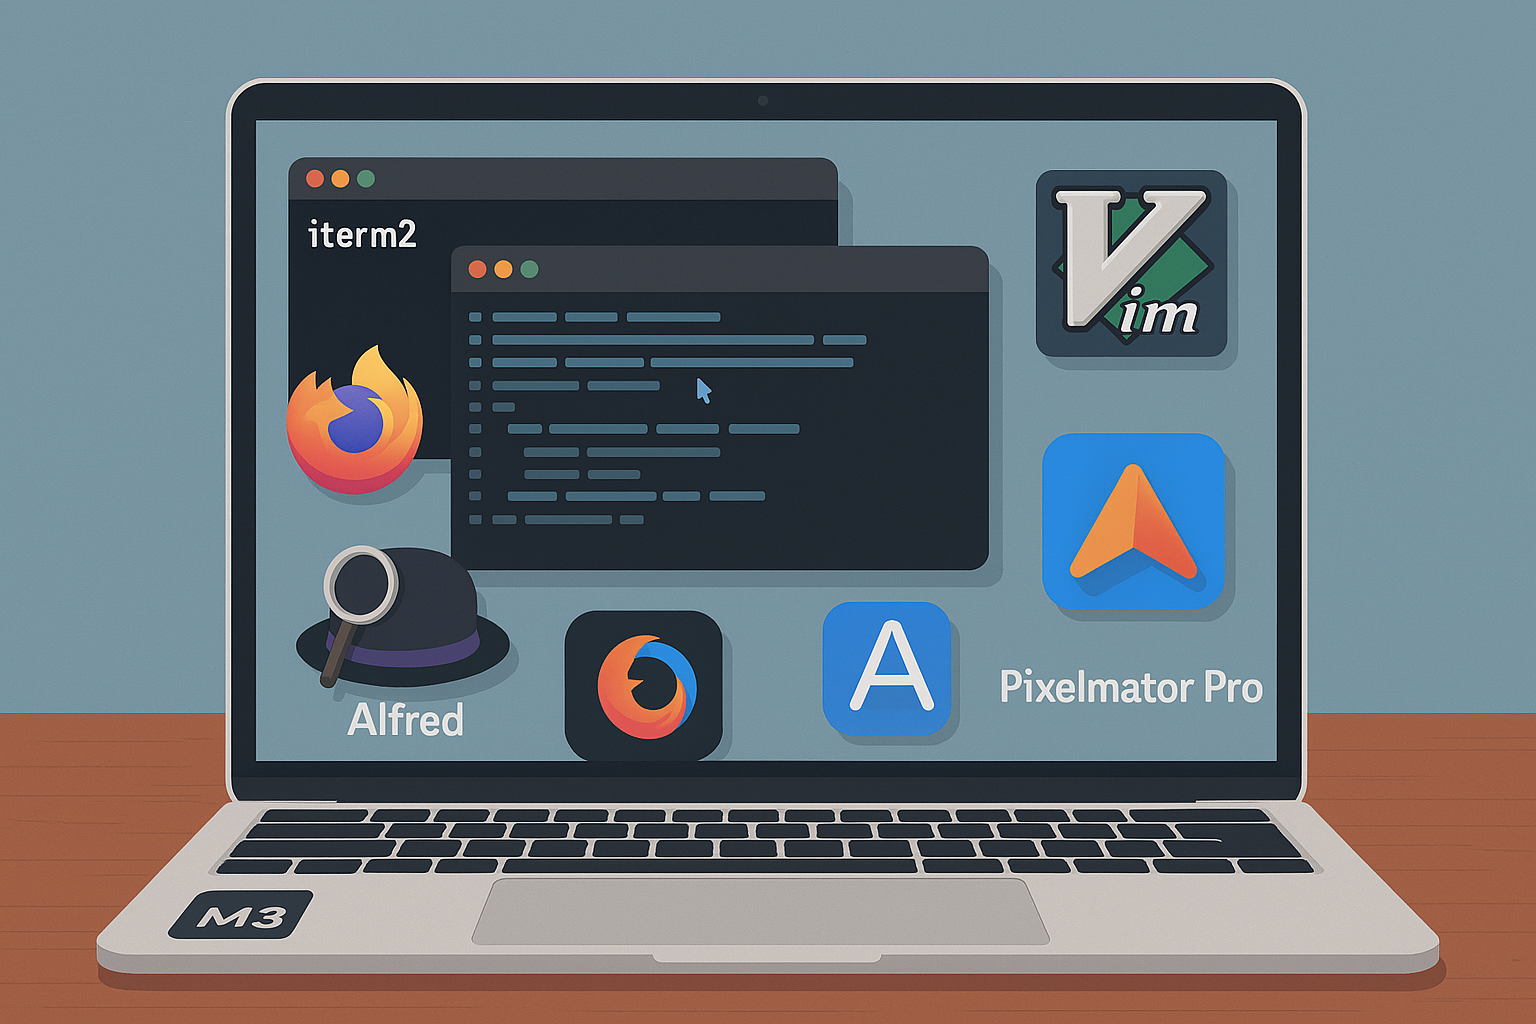
    I use Firefox as my preferred browser because it’s open source and Google has enough of my data without including everything from my browser. Mozilla changed the longstanding “Copy Link Address” hotkey from “A” to “L” in Firefox 88 which really, really disrupted my workflow, so I wrote an extension to change it back which I can’t live without: https://addons.mozilla.org/en-US/firefox/addon/link-copy/. In addition to this extension, I use the Alfred Browser Integration (more on that later) and Proxy SwitchyOmega which is a tool that allows you to create proxy rules based on hostname or IP which is critical for systems tasks like interacting with servers via IPMI… and that’s it for browser extensions.

    I use iterm2 as my terminal emulator because it kicks serious ass and is easily one of the best free pieces of software I’ve ever used. Some configurations I like for using it include setting the terminal backscroll to 50,000 lines (from 1,000) profiles > {profile} > terminal, a hotkey to send iterm2 to the back of all windows or bring it to the front (I use control + z), and this tab style arrangement for windows:

    I use ctrl+tab to cycle through the tabs or option + {number} to jump to a specific window. You can do all kinds of other cool stuff with iterm2 as well, broadcast commands to all windows, anything you can imagine really. It’s really well designed software and I highly recommend donating to the developers for the incredible gift they have provided nerds everywhere simple smile.

    I use zsh as my shell since it’s the default in MacOS (though I write all my scripts in bash) and some small customization via oh-my-zsh but really only for visual stuff like easier to read text and git information on my prompt:

    In general, I try REALLY HARD to try and stick with the defaults wherever possible. This is because I work on servers and docker containers and kuberenetes pods and other remote hosts where the state and configuration of said host machine is often unknown and may not even be modifiable at all. So, much like the laptop theory, I try to learn and get proficient with the tools I will always have. I don’t need the fancy stuff from oh-my-zsh to work on a remote machine, but I might suffer if I spent time getting used to fzf for file browsing, for example.

    This of course brings me to my default editor. I use vim:

    Vim is pretty much available everywhere by default and it always works the same – it’s the tool I always have. This is good. On my Macbook I have shellcheck integrated, but it’s not really a requirement — and that’s it for plugins. For vim preferences, I’ll use the defaults in most cases or some very basic .vimrc customization if it’s a long term host like the servers in my homelab, but again, I try not to do too many things that will make me useless or less productive if I don’t have them. Here’s a link to my very simple/basic dotfiles.

    Software

    One recurring theme about the software I use – I try to avoid SaaS at all costs. In general, if I can’t pay for it once and have it forever – options to pay to upgrade major versions are okay if the software is good enough – but paying monthly or it stops working? no. If I can’t find this or something that doesn’t need my specific need, I usually write a small program that does it. For example:

    HackerNewsIcon – A macOS menu bar app I wrote that monitors Hacker News for top posts. Displays trending articles and notifies you when a new post reaches your set score threshold:

    My colleague Chris Laffin somehow found this gem of a text editor app called TextMate which is another incredible piece of free software probably only second to iterm2 in the value it provides for its price. He put me and a few other systems folks onto it and we’ve been using it ever since. Native, performant, awesome. I use this like a scratch pad to hold temporary information or perform work that works better in a visual environment where it’s a better buffer than vim – and there are usually plenty of use cases for this: log files, for example.

    Alfred – can’t live without this one, and I know most of my fellow Automatticians already use this or know about it. Alfred is basically my go-to for everything. I use it as a spotlight replacement and basically as the interface to my machine in parallel with my terminal. I can press command+space and instantly open any file on my system, run a translation, run something through an LLM (locally via ollama or remote), search anything in MGS/Slack/Matticspace, lock my machine… it’s basically how I use my computer. I also have hundreds of snippets for anything I have to type more than a few times including long terminal commands, common troubleshooting instructions, hell, even typing wp; expands to WordPress.com simple smile. As mentioned previously, I also have the browser integration installed so I can search any of my open browser tabs through this interface. As anyone who has went down a troubleshooting rabbit hole knows, this is a game-changer. Need to go back to that collins tab you were looking at 20 tabs ago? command + space then tab collins — game. changer.

    Adium – I use this as a WordPress.com Jabber client to monitor p2s and get an instant notification when a new post, comment, etc is propagated. I get a lot of comments on how fast I reply or react to posts. This is my secret sauce 🙂

    Magnet – I use this as a window manager. In general my screen is chaotic and and not all organized, but I have the magnet keyboard shortcuts memorized to quickly arrange something side by side or in quadrants if needed. I think MacOS might do window management by default now, but I’m used to Magnet and it was a one time purchase / not SaaS so I reap the benefit of being used to it and owning it forever 🙂

    Pixelmator Pro – It’s like photoshop except maybe better and it was a one time purchase 🙂 — totally worth it. I use it for all my image generation needs. Well, almost all…..

    ffmpeg – I mean this thing does everything. Video conversion, image conversion, video to gif, all kinds of other weird stuff. You may not know how to do it, but ffmpeg supports it

    Amphetamine – this thing is cool. It keeps your mac display awake for however long you set it. I love software like this. It does one thing, does it well and does it reliably. I don’t want to modify my mac settings to do stuff, like keep the mac from sleeping when I’m running a time machine backup, so I set Amphetamine to 6 hours and lock my machine. Easy. Done. Never thought about it twice.

    k9s – k9s is a TUI interface for managing a kubernetes cluster. This thing is invaluable and every day I pay homage to my colleague Chad or teaching me about it. I used to use Lens, but then they wanted money so I converted and haven’t looked back:

    Wireshark – The industry standard tool for analyzing packets. Use it all the time in debugging.

    ntfy.sh – This thing is a pretty cool notification app. I use it sometimes to send non-sensitive information to my phone. do thing; when done curl -d "$HOSTNAME thing is done" ntfy.sh/rudy_notification and I get a notification on my phone when thing is done. Cool.

    Textual 7 – I use textual as do most other folks in systems at Automattic to interface with IRC. It’s a native app and I’ve tried lots of others and this thing seems to be the best. Per channel notifications based on string matches is the number one thing that makes this thing useful to me. The interface is also compact and easy to use.

    Some other things obviously should go without saying – like yes I’m using Slack as my ephemeral communication tool and Homebrew as my Mac package manager. Yes I use Spotify to listen to music (one of the only app-based subscriptions I have!!!).

    And that’s pretty much it. One of the first concepts taught when I was learning how to program computers was KISS, or, Keep it Simple, Stupid! and I’ve tried to carry this advice throughout my career and life when it comes to tech. Abstraction kills, simplicity scales, always apply first principles to every problem.

    I would love to field questions about anything I’ve written here or hear from you about the software you can’t live without. Feel free to DM me or, even better, leave a comment here to discuss so all may benefit 🙂

    This post was not written with the assistance of AI 🙂

  • Running Isolated Network Containers with NordVPN: A Privacy-First Approach

    Running Isolated Network Containers with NordVPN: A Privacy-First Approach

    In today’s digital landscape, privacy has become increasingly important. While many of us use VPNs on our personal devices, integrating VPN capabilities directly into containerized services offers a powerful and flexible approach to network isolation.

    Here’s how a simple Docker container with NordVPN can transform your self-hosted services.

    The Power of Isolated Networks

    When running services on your home server or Linux machine, those services typically share your home network’s IP address. This presents a few challenges:

    1. Privacy Exposure: All services inherit your home network’s digital footprint
    2. Network Isolation: Limited ability to route specific services through different network paths
    3. Fine-grained control: You can of course VPN the entire machine, but you may not want to do that.

    Using Docker containers with built-in VPN capabilities solves all three of these problems elegantly.

    Why Container-Level VPN Matters

    The real power of this approach is the separation of network concerns:

    • Your host machine maintains its original IP address and network settings
    • Individual containers can operate on completely different networks via VPN
    • Multiple containers can use different VPN connections simultaneously
    • Network traffic is isolated at the container level

    This architecture provides an exceptional level of control over your network topology without modifying your host machine’s configuration.

    The docker-nordvpn-transmission Project

    I recently published a project that demonstrates this concept perfectly: a Docker container that runs NordVPN with the Transmission BitTorrent client built-in. Everything works out of the box, you just need to pass it a token and a few config options.

    The magic happens through a few simple components:

    • A Dockerfile that builds an Ubuntu container with the NordVPN client and Transmission
    • A startup script that handles the VPN connection before any services start
    • Docker Compose configuration that provides the necessary container capabilities
    • Helper scripts to verify and change VPN connections on the fly

    With a single docker-compose up -d command, you get a container that:

    1. Establishes a secure NordVPN connection
    2. Starts Transmission with a web interface accessible on your local network
    3. Routes all Transmission traffic through the VPN
    4. Maintains its own unique IP address completely separate from your host

    Beyond Torrenting: A Pattern for Network Isolation

    While Transmission is included as a useful example, the real value is the pattern. This is kind of the most important part of the proof of concept for me.

    This same approach can be applied to:

    • Web scrapers that need to appear from different regions
    • Media servers accessing geo-restricted content
    • Development environments that need to test region-specific features
    • Security tools that benefit from network isolation
    • Any service where you want network separation from your home IP

    The Simplicity Is the Innovation

    What makes this approach powerful is its simplicity:

    services:
      vpn-container:
        build: .
        cap_add:
          - NET_ADMIN
        devices:
          - /dev/net/tun
        environment:
          NORDVPN_TOKEN: "your_token"
        # Mount your service config and data here
    

    With just these few lines in a Docker Compose file, you can create containers with completely isolated network stacks. The pattern is reusable across any service you want to isolate.

    Want to try this for yourself? The full project is available here:
    👉 https://github.com/rfaile313/docker-nordvpn-transmission

    You’ll need:

    • A NordVPN subscription and API token
    • Docker and Docker Compose installed
    • Basic familiarity with container concepts

    The repository includes everything needed to get started, including helpful scripts to check your container’s IP address and verify it differs from your host machine.

    Network isolation shouldn’t require complex networking setups or modifying your host machine’s configuration. With Docker containers and NordVPN, you can create isolated network environments for specific services with minimal setup.

    The real power is in the pattern itself — a foundation for building privacy-focused containerized services that operate on networks completely separated from your home infrastructure.

    Questions about this? Feel free to ask me 🙂

  • Claude kind of sucks

    Claude kind of sucks

    So there’s been a ton of hype around Claude, and I recently watched the Fireship video talking about how good Claude 3.7 is—how it outperformed all these other models, this, that, blah blah—to the point where I actually became interested in it. It isn’t that normal for me to be interested enough to try some new AI tool. Don’t get me wrong: I think AI is cool, and it’s really nice for handling a lot of otherwise mundane and boring tasks, but if you’re trying to use it to solve new or complex problems…it’s usually more trouble than it’s worth.

    In my experience, you really need to be familiar with the problem you’re asking it to solve. Otherwise, you’ll have no idea if it’s correct or not because, at their core, these LLMs are just trying to predict the next sequence of words that will make you happy. They’re not thinking. Sure, they’re getting more advanced, with backstops and more complex reasoning models, but at the end of the day, they’re just text prediction models.

    Anyway, I say all of this because I actually paid the money, downloaded the Claude Code Terminal thing, and tried to get it to do something really simple. My prompt: I have a Mac running Sequoia 15.3.1, and I want you to put an icon at the top of the Mac. It doesn’t need to do anything, it just needs to be there and when I click it I should see a dropdown menu. If you know anything about Mac development, all that means is a Mac app that’s agent-only—it has no Dock icon, just an icon at the top of the screen. Simple enough, right?

    Wrong. This thing, in like five dollars’ worth of prompts over multiple sessions, could not put an icon at the top of the Mac. It was ridiculous. It got so bad that, by the time we were finished, it was telling me there was probably a problem with my system and that I should reset the NVRAM on my Mac or take it to get repaired. lol.

    This so-called advanced, crazy-good model? I am not sure what people are using it for. From what I can tell from the fireship video, it’s really good at solving LeetCode problems—which I have not found to be that useful when actually trying to actually build things—or supposedly it’s great for front-end web development, like TypeScript or React or whatever. But when it comes to putting an icon at the top of a Mac, it is… um… not good.

    Anyway, after multiple tries, multiple sessions, multiple prompts—five dollars’ worth of credits, which is a lot of tokens—I went to ChatGPT. Not even their advanced o1 model, not the research mode, nothing crazy, just regular GPT-4o. I asked the same thing, and first try, it gave me the code and instructions to put an icon in the freaking Mac 😆.

    So yeah, I’m not sure if Claude is as good as everyone’s making it out to be or if perhaps it just can’t put an icon at the top of a MacOS computer. I still think AI is more of a supplemental tool than a developer replacement at this point.

    All that being said, the reason I wanted an icon in the first place is that I check Hacker News daily, and it’s easy to forget to go there. Sometimes there’s nothing good, and sometimes I just forget. So what I wanted was a little icon at the top of the Mac that would show the newest five items from Hacker News with over a certain threshold of points—by default, 250, but that can be changed in the preferences.

    That way, whenever I open my Mac, the most recent popular posts with over 250 points are right there. I set it to check once an hour throughout the day, so if something new pops up that meets the threshold, I get a little blip—a beep, a ping, whatever—and it reminds me, oh, OK, maybe there’s something interesting there. And if it gets too noisy, you can just increase the threshold, or if you want to see things more often, you can decrease it. If something looks interesting, clicking it will take you directly to the article:

    Easy. Super easy.

    So yeah, if that seems interesting to you too, here’s the link to the app/code. You can either build from source or just download this zip, unzip the app, and run it.

  • How to convert an SSH2 Public Key into an OpenSSH public key

    How to convert an SSH2 Public Key into an OpenSSH public key

    When working with people who don’t use a Unix-based operating system, you’ll often come across the SSH2 Public Key format. PuTTY is probably the most famous software using this format and nearly everyone on Windows uses it. To give these windows ssh users access to a Linux system, SFTP server, Git repository or other systems that use the OpenSSH key format, you need to convert an SSH2 public key into the OpenSSH format. This article describes how to do exactly that.

    Okay, onto the openssh key converting goodness!

    The Problem: SSH2-formatted keys

    You receive an openssh-formatted public key looking like this:

    ---- BEGIN SSH2 PUBLIC KEY ----
    Comment: "rsa-key-20160402" AAAAB3NzaC1yc2EAAAABJQAAAgEAiL0jjDdFqK/kYThqKt7THrjABTPWvXmB3URI pGKCP/jZlSuCUP3Oc+IxuFeXSIMvVIYeW2PZAjXQGTn60XzPHr+M0NoGcPAvzZf2 u57aX3YKaL93cZSBHR97H+XhcYdrm7ATwfjMDgfgj7+VTvW4nI46Z+qjxmYifc8u VELolg1TDHWY789ggcdvy92oGjB0VUgMEywrOP+LS0DgG4dmkoUBWGP9dvYcPZDU F4q0XY9ZHhvyPWEZ3o2vETTrEJr9QHYwgjmFfJn2VFNnD/4qeDDHOmSlDgEOfQcZ Im+XUOn9eVsv//dAPSY/yMJXf8d0ZSm+VS29QShMjA4R+7yh5WhsIhouBRno2PpE VVb37Xwe3V6U3o9UnQ3ADtL75DbrZ5beNWcmKzlJ7jVX5QzHSBAnePbBx/fyeP/f 144xPtJWB3jW/kXjtPyWjpzGndaPQ0WgXkbf8fvIuB3NJTTcZ7PeIKnLaMIzT5XN CR+xobvdC8J9d6k84/q/laJKF3G8KbRGPNwnoVg1cwWFez+dzqo2ypcTtv/20yAm z86EvuohZoWrtoWvkZLCoyxdqO93ymEjgHAn2bsIWyOODtXovxAJqPgk3dxM1f9P AEQwc1bG+Z/Gc1Fd8DncgxyhKSQzLsfWroTnIn8wsnmhPJtaZWNuT5BJa8GhnzX0 9g6nhbk= ---- END SSH2 PUBLIC KEY ----

    And want to convert it to an ssh key format like this:

    ssh-rsa AAAAB3NzaC1yc2EAAAABJQAAAgEAiL0jjDdFqK/kYThqKt7THrjABTPWvXmB3URIpGKCP/jZlSuCUP3Oc+IxuFeXSIMvVIYeW2PZAjXQGTn60XzPHr+M0NoGcPAvzZf2u57aX3YKaL93cZSBHR97H+XhcYdrm7ATwfjMDgfgj7+VTvW4nI46Z+qjxmYifc8uVELolg1TDHWY789ggcdvy92oGjB0VUgMEywrOP+LS0DgG4dmkoUBWGP9dvYcPZDUF4q0XY9ZHhvyPWEZ3o2vETTrEJr9QHYwgjmFfJn2VFNnD/4qeDDHOmSlDgEOfQcZIm+XUOn9eVsv//dAPSY/yMJXf8d0ZSm+VS29QShMjA4R+7yh5WhsIhouBRno2PpEVVb37Xwe3V6U3o9UnQ3ADtL75DbrZ5beNWcmKzlJ7jVX5QzHSBAnePbBx/fyeP/f144xPtJWB3jW/kXjtPyWjpzGndaPQ0WgXkbf8fvIuB3NJTTcZ7PeIKnLaMIzT5XNCR+xobvdC8J9d6k84/q/laJKF3G8KbRGPNwnoVg1cwWFez+dzqo2ypcTtv/20yAmz86EvuohZoWrtoWvkZLCoyxdqO93ymEjgHAn2bsIWyOODtXovxAJqPgk3dxM1f9PAEQwc1bG+Z/Gc1Fd8DncgxyhKSQzLsfWroTnIn8wsnmhPJtaZWNuT5BJa8GhnzX09g6nhbk=

    Solution: Convert the SSH2-formatted key to OpenSSH

    You can do this with a very simple command:

    ssh-keygen -i -f ssh2.pub > openssh.pub

    The command above will take the key from the file ssh2.pub and write it to openssh.pub.

    If you just want to look at the openssh key material, or have it ready for copy and paste, then you don’t have to worry about piping stdout into a file (same command as above, without the last part):

    ssh-keygen -i -f ssh2.pub

    This will simply display the public key in the OpenSSH format.

    A more practical example of this might be converting and appending a coworker’s key to a server’s authorized keys file. This can be achieved using the following command:

    ssh-keygen -i -f coworker.pub >> ~/.ssh/authorized_keys

    After this a coworker, using the according private key will be able to log into the system as the user who runs this command.

    The Other Direction: Converting SSH2 keys to the OpenSSH Format

    The opposite — converting OpenSSH to SSH2 keys — is also possible, of course. Simply use the -e (for export) flag, instead of -i (for import).

    ssh-keygen -e -f openssh.pub > ssh2.pub

    Conclusion

    Knowing these kinds of essential Linux tools can make your life as a sysadmin much easier. Converting an SSH2 key to OpenSSH is something that you’ll find yourself doing on a fairly irregular basis, so it’s good to have the command written down somewhere.

    Consider starting a “useful_commands.txt” file, or just keep a link to this post in your bookmarks.

    I hope you enjoyed this little article! If you have any questions, please comment. For more information on dealing with SSH Keys you might want to take a look at the ssh-keygen manual page (type man ssh-keygen into your terminal). It’s a good idea to read over a few of the options that this command provides.

  • Global Game Jam 2021

    Global Game Jam 2021

    As I mentioned in my last post, I was able to hook up with a local team from The Greater Gaming Society of San Antonio and participate in this year’s Global Game Jam. Global Game Jam® (GGJ) is the world’s largest game creation event taking place around the globe. This year’s theme was “lost and found” and the team decided that a private investigation / noir type game would be fun. So my teammate Ansley spun up some art and Wes composed some music and we got to work. We ended up naming the game “Chase Ventura: Kid Detective” – a mystery game where you have to find clues as the neighborhood kid sleuth to “solve cases”.

    Animated title screen for "Chase Ventura: Kid Detective" - our team's submission for the Global Game Jam of 2021
    The game’s title screen

    Overall it was a super cool experience. I was lucky to have a great team; they produced super quality assets to work with and were great at communicating and providing feedback. I wish there had been more time to implement all of the ideas, there was just too much to do in such a short amount of time. I guess that’s the nature of game jams though. I also wrote the game’s systems from scratch and that detracted a lot of time as well. Unfortunately with four hours to go and tons to do, I had to strip virtually every idea out of the game to get something shipped, so you basically get a cut-scene, and then walk around the neighborhood and talk to the various characters Ansley created. Fortunately I feel like our team was on the same page and the game, the art, and the music fit well together. Here are some stills from the game:

    I put up a little time-lapse of the last four hours of the Jam condensed to 10 minutes (the deadline was at 5pm CST and I think I submitted at 4:56pm):

    I’m super thankful to my wife for being supportive as I basically spent 48 hours binging over code. Also a big thanks to John and his team over at the Greater Gaming Society of San Antonio for putting on the event and helping me get on a team to participate.

    If you haven’t ever done a game jam I think it’s a great exercise from a development perspective for a few reasons:

    • Even though I broke every programming best practice, from DRY to bad spaghetti code, the time constraints force you to move forward with the mistakes and take the least path of resistance at every turn, forcing you to write a lot more code and figure out problems quickly on the fly.
    • Letting your team dictate the idea and direction of the game takes you out of your comfort zone for games or projects you would normally make.
    • Reviewing your own code after the fact gives you an opportunity to review what you could have done to make the code better / more extensible if you had ideal conditions.

    While it was stressful, It’s also great fun in general. We also ended up taking second place out of our portion of the GGJ, and I am pretty happy about that 😀.

    Here’s the link to the Jam Page:

    https://globalgamejam.org/2021/games/chase-ventura-kid-detective-8

    And here’s a link to play the game online (recommended browser: Chrome)

    https://ggj2021.rudyfaile.com/

  • 2021: Complete projects, current projects, and beyond!

    2021: Complete projects, current projects, and beyond!

    It looks like it has been about 2 months since my last post 😬! November and December were crazy months for me in both my work and personal life. 2020 kept coming until the bitter end…

    When I wasn’t up to my eyebrows in work, I carved out some time to finally work on and complete the multiplayer board game I had been working on since September:

    Image of the Cavatars Thumbnail from GitHub

    Cavatars (Codenames with Avatars – clever I know) is a fully functioning multiplayer game playable in a web browser. I developed it in JavaScript using NodeJS, Socket.io, and Phaser3. The full source code is on GitHub:

    https://github.com/rfaile313/cavatars-game

    It’s not the greatest thing I’ve ever written but it plays like it was intended. What I was most surprised about when testing it with friends was how well the latency responded across multiple states. We had players in California, Texas, and Nevada with the server being located in San Francisco, and there was no visible lag:

    Cavatars’ maiden voyage 🚢

    Far more importantly though, the project allowed me to meet all of the goals I set when I started this project. All of the decisions I made when developing the game were for specific purposes:

    • Far greater proficiency in JavaScript, which I considered my weakest language at the time.
    • Better understanding of multiplayer gaming, client/server network architecture.
    • Learn Phaser3, a framework I have never used before.

    As one of my friends pointed out, there is no real purpose to the movement of the characters other than the fact it was to hone in on the movement for later projects down the road – which brings me into some of the stuff I have on the table for 2021.

    Building on the art kit I purchased and set of skills I developed to finish Cavatars, I have decided to start working on some other, longer term projects:

    1. Working on a Final Fantasy Tactics type game with my friend Travis. The game is yet to be named and we are in the very early stages. Travis brings a wealth of game knowledge and experience to the table and will handle most of the mechanics, balance, and lore. I will be handling all systems, programming, and development.
    2. Working on a longer term MMO passion project. These sprites and this art kit are perfect to put something like that together, so why not. There aren’t many 2D mmos that have come out in recent memory, so the idea of chipping away at one over the next few years seems exciting!
    3. Working on a smaller game to ship earlier, I’m thinking about a 1v1 multiplayer PVP arena type game.

    Aside from that, I reached out to The Greater Gaming Society of San Antonio which is a game development community in San Antonio that apparently has some folks participating in the upcoming Global Game Jam taking place this week, January 27-31. With any luck I’ll be able to connect with a team and follow up with a post about my experience 🙂

    Until next time…