Category: Technology

  • WordPress.com vs WordPress.org

    WordPress.com vs WordPress.org

    On top of working for Automattic on WordPress.com and our other products, I spend a lot of time volunteering in the open-source WordPress community, sometimes referred to as WordPress.org.

    Now, if you aren’t familiar with the differences with WordPress.com and WordPress.org, it goes like this: Once upon a time there was this fellow named Matt Mullenweg. He and Mike Little released the open-source WordPress software in 2003. WordPress initially started out as blogging software but eventually evolved into a rich and the most widely used content management system (CMS) in the world.

    So what is WordPress.org?

    So, we know WordPress is the software itself. WordPress.org refers to the open source community that supports, develops, and maintains the WordPress software. No single person or entity is in charge and anyone can contribute.

    Now, anyone can download this free software, and install it on a web host or local server. You can hack it, break it, bundle it up and redistribute it (within the parameters of the licensing) and essentially do whatever you want with it.

    Here’s the tricky part

    You still have to find a web host (unless you’re going to run the web server out of your house, which isn’t advisable.) There are lots of hosts out there, with all sorts of different features. WordPress.org has a few recommended hosts here. This is the part where I think people get most confused.

    So, you’ve purchased hosting somewhere, installed WordPress, registered a domain, and connected it to the site. Now you’re setting up the site and you have a question. Who do you ask? WordPress.com right? Wrong!

    WordPress is open-source software. It’s developed, maintained, and supported by the WordPress.org community. You can ask for help on the WordPress.org forums (and there are lots of helpful volunteers!) or the developer of a specific plugin or theme, but that’s it!

    What about my host? They might be able to help. However, most hosts are there to help you with the actual configuration of the web server, and not a whole lot beyond that. There are exceptions to this rule, and hosts like Bluehost have support for the WordPress software, but for the most part, you’re on your own.

    This has its benefits. You’re virtually unlimited in what you can do with your site, the sky (and your hosting restrictions) are the limit.

    Here’s what most people don’t know, though:

    Sure, you can host a site for dirt cheap but it’s probably shared hosting and the bandwidth is likely not great either. How much web storage do you have? If something breaks, what’s the support like? If they’re charging you for SSL, get out. An SSL certificate costs no one anything and it’s a bogus charge, in my opinion.

    In terms of bandwidth: you may not think this is important but if you ever have more than one person connecting to your site, it’s a concern. Take a look, for example, of 50 simulated requests to this site:

    50 requests served in about 5 seconds. I could run that script all day without any issues.

    Let’s compare this to what some other hosts might look like:

    How much do you know about software, web development, security? These are legitimate concerns that any reasonable site owner should have. Remember how I said you’re virtually unlimited in what you can do? You’re also responsible for the security of your site and keeping things up to date. It takes work. Because WordPress is open-source software, hackers find vulnerabilities all the time. These are often patched in WordPress core before they have any real effect on people, but folks install plugins made by third party developers and/or fail to update core and get exploited. Happens every day.

    If you’re a web developer who absolutely knows what they’re doing, this may not be a concern for you. But for the average user, this is a really big deal.

    Enter WordPress.com

    Remember Matt Mullenweg? Shortly after founding WordPress he started his own company, called Automattic, which makes a product called WordPress.com among many others. Automattic is passionate about making the web a better place. The vast majority of its work is available to the public under the GPL, and they heavily contribute to the WordPress.org community and open-source WordPress software.

    So what is WordPress.com?

    WordPress.com at its core is a hosting service like some we’ve discussed above, but it’s really much more than that. It’s a fully managed, site building service, it’s a domain registrar, it’s an all-in-one platform for you to publish your message to the world. It’s much, much more.

    So right out of the gate: You can start on WordPress.com for free. Granted of course, you’ll be using a subdomain on a free site, and some other restrictions, but you can still start writing content, uploading pictures and customizing a theme and site for free. I’m not really aware of another hosting service that will give you a space to host a site for free, especially not a WordPress installation, and especially not with unlimited bandwidth. So that’s nice.

    You can upgrade to a paid plan anytime, or start out with one, and the benefits are massive. On top of all of the features listed at https://wordpress.com/plans you get:

    • Access to run ads with one click (monetization)
    • Unlimited Bandwidth (seriously, it’s blazing fast too)
    • Updates and security all managed for you (this is huge)
    • Real-time backups
    • Free domain for the first year
    • 24/7 support

    Speaking of support: The support at WordPress.com is no joke. These aren’t folks reading off a script, these are bloggers, developers, designers, marketers… in fact, every single person that works at Automattic does a support rotation at least once a year (including Matt himself!)

    Well, we tried.

    There’s also a dedicated team of folks 300+ strong who guide, troubleshoot, live and breathe WordPress all day long. These folks, called Happiness Engineers (👋) do just that by providing world class guidance and troubleshooting day in and day out for our 156 Million+ users across our products. We’ll show you how to set up a WordPress site, we’ll walk you through theme setup, we’ll write CSS for you, we’ll provide advice and best practices for SEO, and we’ll do it all in real time – all for as little as $5, or $8 a month on a Personal or Premium plan.

    We’re also a well-established entity. We’ve been around for 14 years now and we aren’t going anywhere. If you aren’t satisfied with your purchase we have a 30 day no-questions-asked refund policy at WordPress.com on all WordPress.com Products and 5 days for domains.

    We keep things secure. All updates to WordPress core (the open source software) are automatically applied to your WordPress.com site in addition to our proprietary software and most if not all features of the Jetpack plugin (another product we make) see: social media sharing, static file hosting, lazy loading images, video players, advanced SEO, eCommerce tools, premium themes, the list goes on…

    So why doesn’t everyone use WordPress.com?

    Because it has its pros and cons. I’d honestly say (and I look at thousands of sites a month) that for 90% of folks, it’s exactly what you need. You can’t out-scale us. If you get really big, we even have a VIP platform where we have clients like Time, CNN, Variety, People, New York Post, Capital One, even Facebook. Is your site getting more clicks than Time Magazine? Probably not.

    However, that remaining 10% of folks do need the extensibility that is simply much easier on a self-hosted solution. Especially for developers. They may have a client with specific needs. WordPress is powerful, but requires an advanced knowledge of web development to really get in there and work requirements out around a client. If you need to heavily modify or extend the software’s functionality – a self-hosted solution is probably the way to go.

    Lastly, there are a lot of myths floating around.

    Common Myths:

    “You don’t own your site at WordPress.com”

    This simply isn’t true. I don’t know how this rumor got started but I see it everywhere. Some hosts/platform might hold your site and/or content hostage, but we don’t. At My Sites > Settings > Export we provide the option to Export all (or specific) text content (pages, posts, feedback) from your site and also the option to Download all the media library files (images, videos, audio and documents) from your site.

    We also explicitly say this in our Terms of Service:

    Our service is designed to give you as much control and ownership over what goes on your website as possible and encourage you to express yourself freely. You own all content you post to your website.

    https://en.wordpress.com/tos/ Section 7: Service Specific Terms

    “You can’t use plugins”

    This actually used to be true, and still is for non-Business or eCommerce plans but this is because of the way the site architecture is set up on lower-than-business plans. With a WordPress.com Business plan you can install plugins, upload custom themes, have unlimited storage and bandwidth and literal 24/7 real time support among a plethora of other ridiculous features at $25 a month.

    “I need a website, not a blog”

    While WordPress itself started out as blogging software, it’s now a very robust CMS and this is true on .com and .org. At WordPress.com, we use “website” and “blog” as interchangeable terms. All of our themes can be used for either a website or a blog. Our default layout is a blog-style format. Take a look at this video tutorial for a walkthrough on how to change your theme’s layout to a website-style format.

    At the end of the day:

    WordPress.com and WordPress.org both have their pros and cons. WordPress.com is sort like having an apartment. You can’t put in a swimming pool, but if something breaks or you need something you’ll get expert help at no additional cost to you. If you aren’t sure how to paint the walls of your apartment, we’ll buy the paint and show you how. WordPress.org is sort of like owning a house. Sure you can knock down that wall to join two rooms but it’s on you if the house falls, as well.

    That’s a pretty base comparison, but hopefully you get the point. Ultimately, it’s your choice. I hope this post was able to clear a few misconceptions surrounding these two platforms for you.

    Do you have any other questions? Let me know!

  • Setting an Alias in Windows Powershell.

    Setting an Alias in Windows Powershell.

    It’s no secret that the UNIX terminal is a far superior and preferred method for command-line computing. Windows, it seems, is well-aware of this and determined to improve the command line tools on its Operating Systems.

    VScode has already come such a long way. In my opinion, their open-source editor is the best on the market. It seems there’s been a change in direction at Windows as of late, as they ease towards a more open-source and user-centric approach. This is exemplified in Microsoft’s new Windows Terminal, a UNIX-style terminal under development for Windows. There’s already Linux subsystem tools available on some distributions, but it’s finicky at best in its current state.

    While I’m hopeful for the future, I’ve come to enjoy how much closer Windows Powershell is to a UNIX system in terms of syntax and functionality. It isn’t perfect, but I’m determined to make it as close and comfortable as possible.

    Setting an Alias in Powershell

    There’s a lot of conflicting information about there, and the Microsoft docs are kind of vague. After doing some research, here’s what I’ve gathered:

    • It’s not a good idea to add this directly to your $env:WINDIR (sort of like a UNIX root)
    • The recommended way is to add it via a user profile

    Steps from here vary, but I’ve tested this method across a few systems and it seems to be effective.

    • You’ll want a profile1.psl file. This isn’t created by default. To create the profile1.psl file, open up Powershell and type in the following command:
    • new-item $PROFILE.CurrentUserAllHosts -ItemType file -Force
    • to access the file, type in the next command:
    • ise $PROFILE.CurrentUserAllHosts
    • (Conditional) This should be enough, but if you have an issue with this that means you need to change your execution policy: run
      Set-ExecutionPolicy -Scope CurrentUser then RemoteSigned then run the ise command again.

    Otherwise, the first two commands should be enough to create the profile then pull it up in Windows Powershell ISE (Integrated Scripting Environment) – it looks like this:

    From here, we can set alias’ that call functions. You can see in my example that I’ve written a function that:

    • Changes directory
    • Opens Google in a web browser
    • Removes a file in the current directory named fileName.txt

    All we have to do now is set up an alias that calls that function. Anywhere below the closing bracket of the function we can write:

    Set-Alias google goSomewhereThenOpenGoogleThenDeleteSomething

    Now save, exit the ISE and Powershell and restart. You should be able to type google as a command with nothing else to run the function you just created. It might throw an error saying: rm : Cannot find path 'C:\Users\fileName.txt' because it does not exist. which is expected but if it opens Google in a browser, that means it was successful.

    Handy to do

    I’ve set Alias’ for a lot of things but most handy are to set alias’ to check your profile’s location and open it in case you want to add more, you won’t have to remember the steps.

    I use profile which displays:

    and as you can see above, profile_open which runs the command to open my profile in the ISE, ise $PROFILE.CurrentUserAllHosts

    In addition to that, I set commonly used scripts and programs on Alias for convenience so I don’t have to navigate to a directory and execute with the program prefix. E.g. my most recent ratelimit script I wrote for work, I just type ratelimit from anywhere to start the program:

  • One Rep Max Calc and SSL oh my!

    One Rep Max Calc and SSL oh my!

    Today I touched up https://strong.rudyfaile.com/ by adding SSL and forcing http redirects. I should have done this in the first place, seeing how easy SSL with Let’s Encrypt is but hey, it’s done now. I also put SSL on the other subdomain projects.

    I also added a one rep max calculator which lives at https://max.rudyfaile.com/ (and is linked in the 5/3/1 program generator, see below:)

    😄

    The purpose of the one rep max calculator is to help you find a 1 rep max if you aren’t looking to necessarily lift the absolute amount of weight that you absolutely can in a single rep. In a perfect world, you should always try.

    Let’s say however that you generate a four-week program and on week 3 you miss your lift for 1+ reps in the last set (set 3). It will be tough to calculate an accurate four week program without a number, and it’s never a good idea to guess. Instead, you could lift a lower weight (not too much lower) for as many reps as you can using the 1 rep max calculator. This will allow you to use a decently estimated number for the next program generator.

    In other news: https://strong.rudyfaile.com/ and https://game.rudyfaile.com/ have SSL now too. One cool thing about that is you can play Lucy’s Adventure offline as a result (assuming you’ve already loaded the game) 😄

  • Lucy’s Adventure call for testing!

    Lucy’s Adventure call for testing!

    I made a recent post about my progress working on this game.

    If you’d like, you can play the work in progress 👉 here!

    Feedback/comments/suggestions welcome 😄

    I’m still working on the final art/sounds/music and adding more levels. I’ll have controller support in soon as well 🙂

  • Fortuitous A.I. Mechanics

    Fortuitous A.I. Mechanics

    Kristen is out of town today which means I have some free time to drill down and work on my little game side project. The working title is “Lucy’s Adventure” (Lucy being the fox). It’s a Super Meat Boy/Boshy inspired platformer that aims to be progressively difficult, but in a non-bullshit type of way. Translation: death happens a lot, but the game telegraphs to the player how. The goal is for the player to feel like every death could have been avoidable.

    After completing the game’s first two levels, aptly named “Baby Steps” and “Mechanics” I started work on level 3: the game’s first boss fight. In this fight, Lucy picks up an M16 which initiates a battle with the Boss of the first three stages: Lava Lord.

    Sometimes when programming, the funniest and/or most unexpected things can happen. In my case, this usually is from a result of lack of understanding, a mistake, or more often: laziness. These two images sum this up perfectly:

    For example, I didn’t want to redraw or edit sprites to have the gun move with Lucy, so the gun destroys itself and redraws every frame on Lucy’s position. It works great, and looks hilarious. Perfect.

    😂

    Even more funny was when I started programming the Boss’ A.I. It’s a pretty challenging process in itself, lots of function tail calls and recursion until certain conditions are met, signalling the boss to change states. I created some states to bring what I’ve considered abstractly to the game. When I ran my build, I just about lost it:

    Holy…

    The problem was obvious: I was calling the function that handled the Boss’ attack incorrectly. However, the outcome was better than if the game were working properly: it was harder to dodge, and actually looked pretty cool.

    LAME

    After I fixed it (he only throws a single fireball, which was the original intention) it felt… lame. Obviously the movement will be sped up, but a single fireball at this point seems unfulfilling.

    I wonder if I should change it back. If I do, I wonder if creating so many instances of the fireball object like that will run poorly in some browsers or devices. I wonder if I should find a way to make it look like that properly without devastating that poor Android device running KitKat.

    I wonder how many developers work on software and make mistakes that become features. It’s really a great feeling. I imagine it’s like painting a picture and spilling the paint bucket on the canvas. While you’re initially worried that you screwed up, on second look – that blotch kind of looks like something, let me add a few more colors. Wow, that mistake really made the piece!

    At a minimum, I definitely think I need more fireballs on this canvas 🔥.

  • What is Bitcoin?

    What is Bitcoin?

    I’ve been getting a ton of messages asking me what Bitcoin is and/or why we should use it. I’ve been asked so much that I decided to make a video that outlines the what and why at a high level.


    For those more technically inclined and want to learn more, feel free to continue blowing up my inbox.

  • I built a crypto miner. You can too!

    I built a crypto miner. You can too!

    Table of Contents

    Background
    Purchase
    Initial Problems
    Success!
    Setting up your miner
    Conclusion
    Update


    Skip Background and get to installation

    Background

    Working through my master’s degree in technology, I began to notice a common theme. We pored over endless lit reviews which included futurists such as Ray Kurzweil and other like-minded fellows who spoke of an incredible concept just on the horizon of the Second Machine Age. This concept? De-Centralization.

    It didn’t really hit home until we began to see some data. Do you know which organization controls the most available hotel rooms at any given time in the world? It isn’t Marriot, it’s AirBnB. Any idea how many hotels AirBnB owns? I’ll give you a hint: you can’t divide by it mathematically. Let’s look at transportation: who do you think is providing the most passenger fares in the world? Oh, that little taxi company called Uber. How many taxis do they own? You guessed it.

    powerofzero.jpg

    I started to delve deeper into this de-centralization concept. Naturally, I stumbled across cryptocurrency, and suddenly, the dots connected. I’m no stranger to Cryptocurrencies, I have been following Bitcoin since 2010, and mined back when you could still do so on GPUs (those days are long gone and, sadly, I have no idea where that giant, old, 250gb externally powered hard drive is). I’m not going to act like I had a ton of coins like this poor fellow. I had a few, but that’s beside the point.

    Fast forward to 2017. Bitcoin is up to $12,700 USD at the time of this article, from a mere $758 exactly one year ago. I’ve been talking about Bitcoin for years, but it wasn’t until the currency surpassed $10,000 last month that people started reaching out to me.

    In what felt like overnight, I received messages in every medium. People that I haven’t spoken with in years, new friends and old the same. All wanted to know my insight on crypto:

    questions.png

    Yeah, even my mom at 5am

    I started to realize I knew more about crypto than I once thought. I read countless websites, and talked to a variety of people and thought: “what? I know more than this….” Ultimately, I decided to put my money where my mouth was.

    My initial goal was to get my hands on a few Antminer S9’s to mine Bitcoin. Unfortunately, they’re constantly out of stock due to an insane demand to the manufacturer, Bitmain, and as a result, the prices have been as high as $4,000+ for a single unit on sites like eBay and craigslist.

    antminers9.png

    Well, I knew I wasn’t going to pay a 37.5% markup on the retail price of $1,500… not to mention the additional power supply cost, so I returned to my roots. I mined crypto with a GPU before right? There had to be crypto out there that’s not on the SHA-256, still capable of being mined by GPU. Fortunately, there is. I chose to mine Ethereum due to its popularity, price, and smart contract focus. But remember, Peter, with high prices come high network hashrates.

    I’m lucky enough to live in Orange County, CA. Just a hop, skip, and jump away from a Micro Center. If you don’t know what Micro Center is, it’s great. Imagine Best Buy, Circuit City, and your favorite nerd passion had a baby. That baby is Micro Center.

    microcenter.jpg

    Purchase

    initialpurchasemicrocenter.jpg

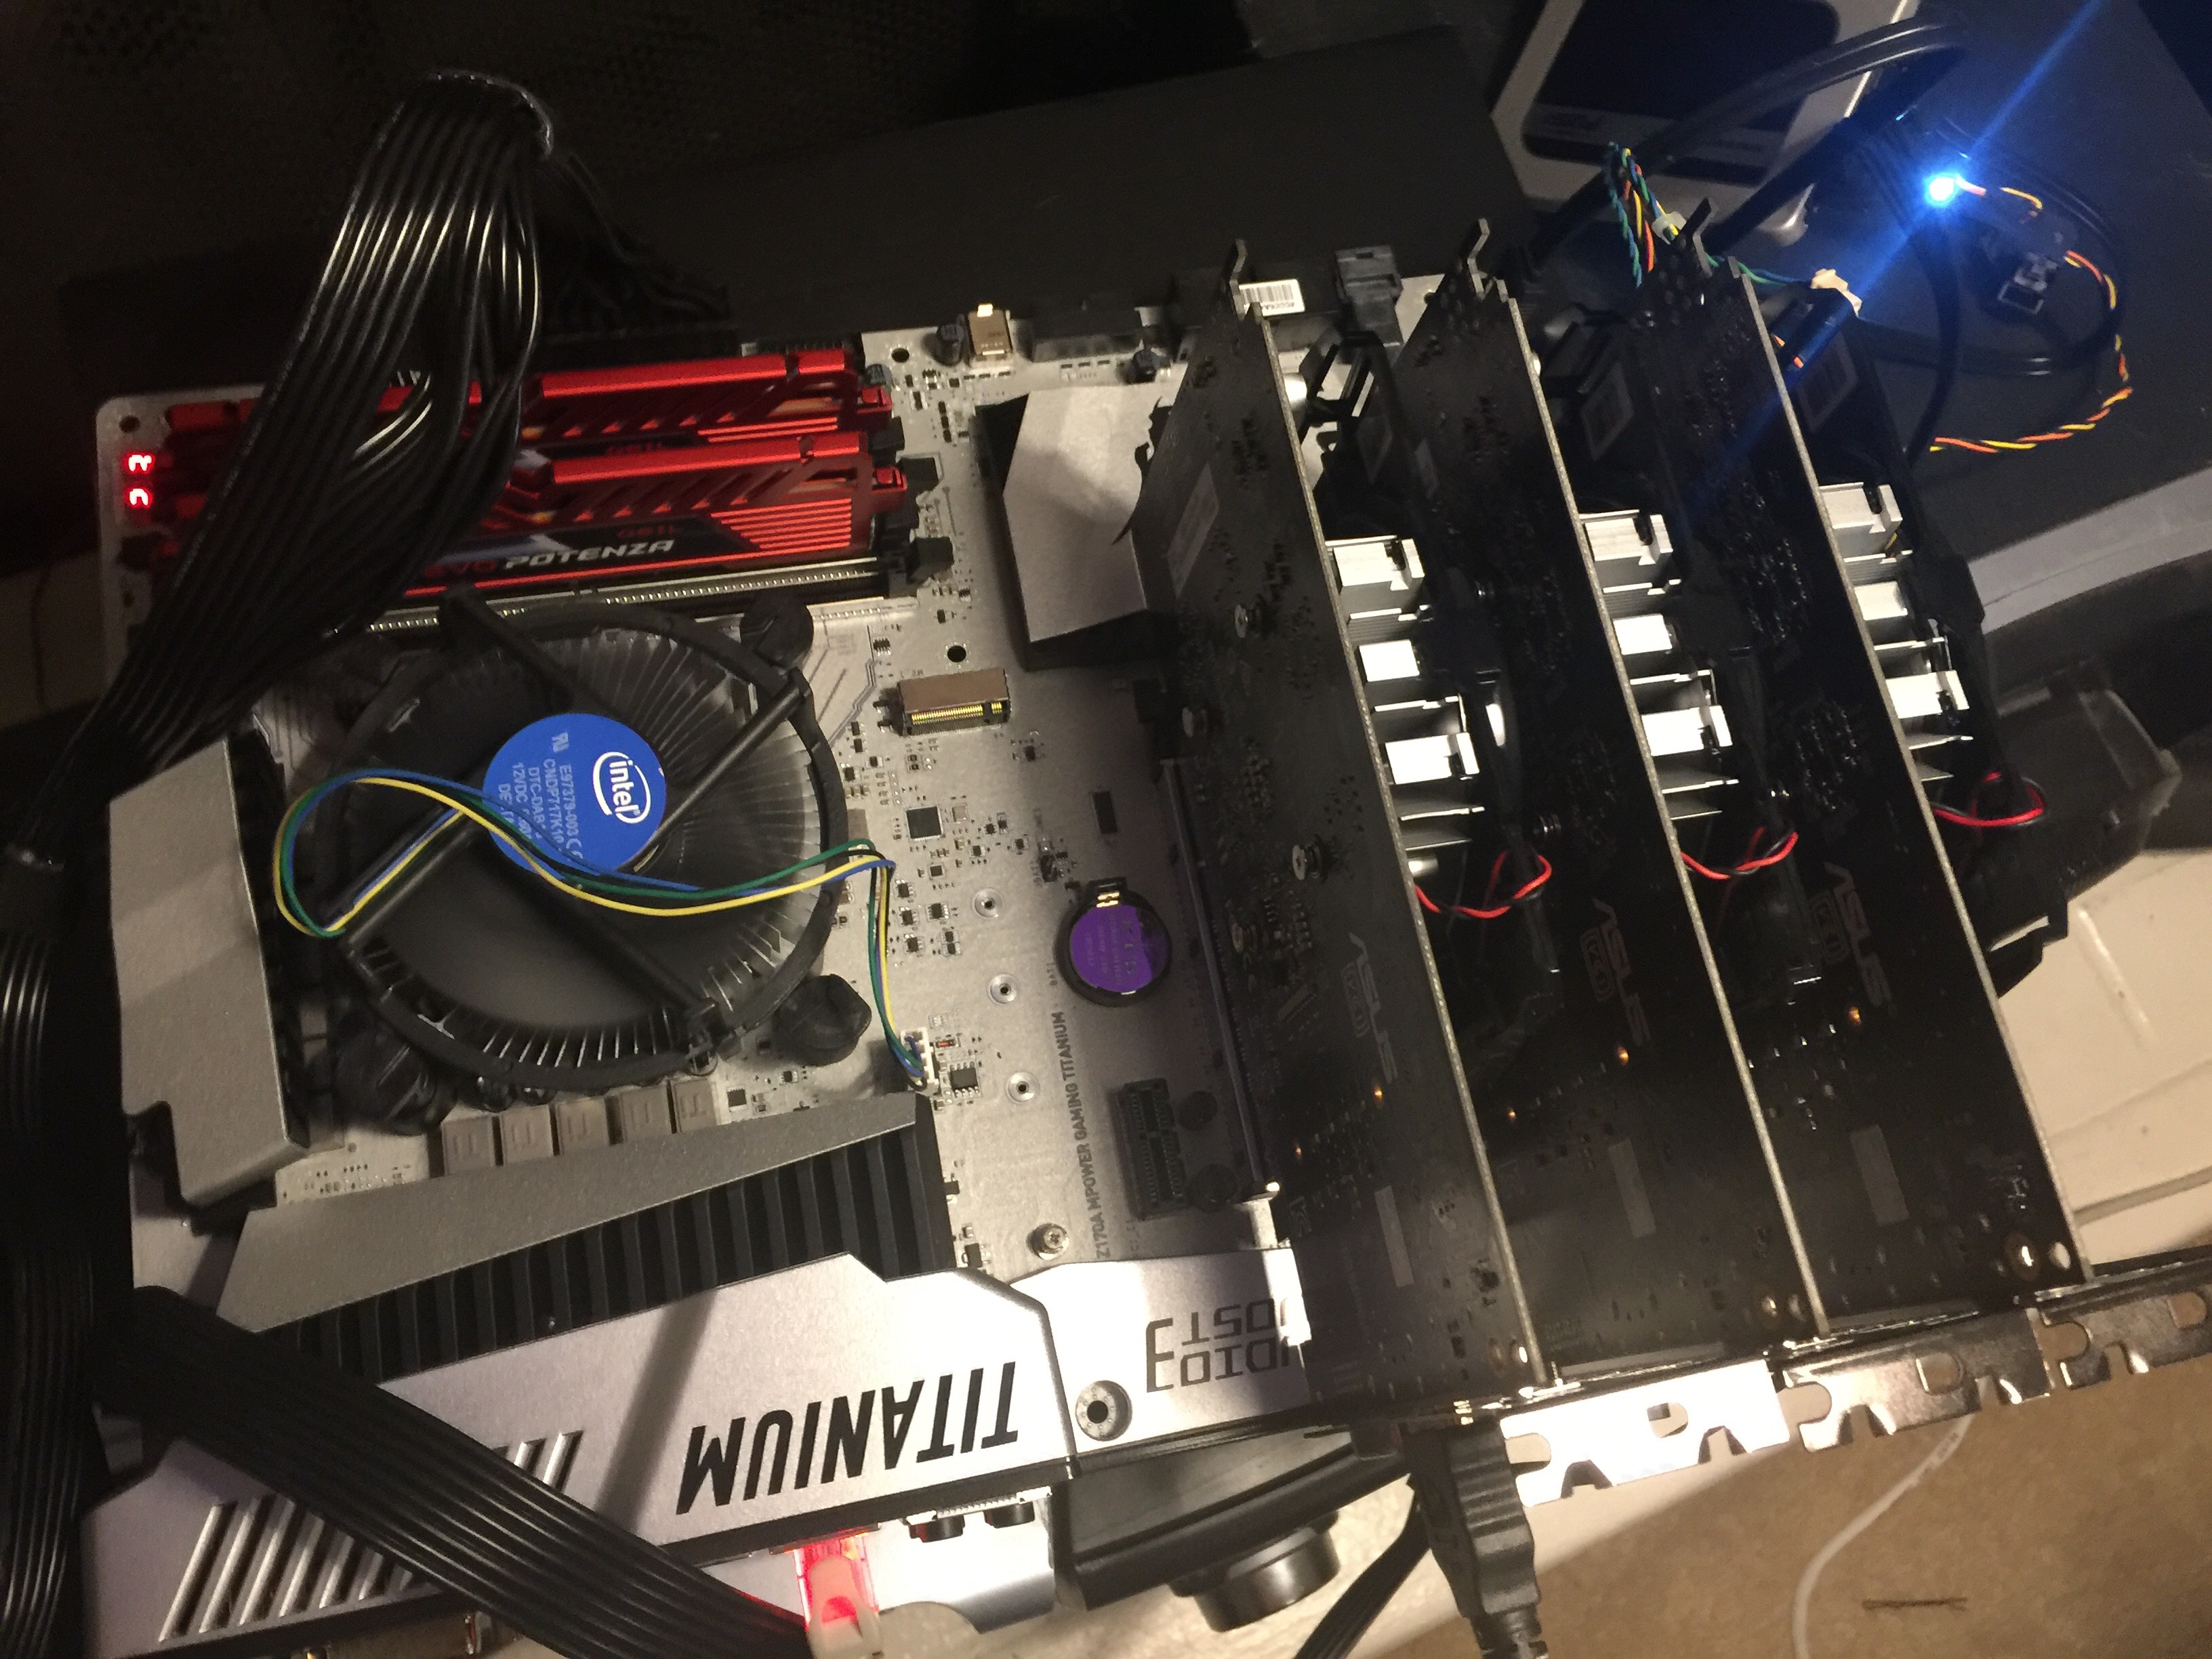
    $1,034 later. I had a lot of computer hardware

    My Miner Specifications

    Component Name
    Motherboard: MSI Z170a Titanium Edition
    Processor: Intel I3-7100 3m Cache, 3.90GHz
    Storage: Crucial 275GB MX300 2.5 SATA SSD
    RAM: GeIL EVO POTENZA 8GB (2 x 4GB) 288-Pin DDR4
    GPU: ASUS Radeon RX 550 (x1)
    GPU: ASUS Radeon RX 550 (x2)
    GPU: ASUS Radeon RX 550 (x3)
    PSU: Thermaltake Toughpower Grand 1200W

    I skimped a bit on eveything. Mining doesn’t require a lot of processing power (at least from the CPU), or RAM for that matter… the bulk of the processing power stems from the GPU. I elected for a simple i3 and 8gb of DDR4 RAM (DDR4 Required by Motherboard). The places I splurged a bit include the motherboard, PSU, and 3x GPUs. When I say a bit, I really mean a bit… this could have been much worse.

    Initial Problems

    I took everything home, promptly threw away every manual and box (WARNING: I DO NOT RECOMMEND THIS) and started connecting things. Although I knew everything was connected properly, I couldn’t get the BIOS to show up on output.picofinitialsetup.jpg

    This wasn’t good. After consulting the motherboard error codes, manual, and every computer forum known to man (shoutout to Tom’s Hardware), I realized my mistake.

    I purchased a 7th Gen processor and a 6th generation motherboard. This was a serious problem because to flash the BIOS you need a 6th generation processor. I didn’t have one. It’s even more unfortunate because 7th generation boards come with a simple FLASHBACK+ mode where you can simply input a USB without display and flash the BIOS….again, I didn’t have that.

    Micro Center to the Rescue!

    Knowing the problem, I took my board back to Micro Center and explained the BIOS upgrade issue. The guy at service repair was super cool and knew exactly what I was talking about. Micro Center flashed the board in less than an hour for $30, which I was happy to pay because it was my mistake and I didn’t want to purchase another processor.

    Success!

    After flashing the BIOS, everything worked famously. I reconnected everything including the 3 GPUs. I created a bootable Linux USB using Win32 Disk Imager in the flavor of Ubuntu 16.04.3.

    From here, it was all gravy. I reconnected the motherboard to the Processor, RAM, PSU, SSD, and inserted the Bootable USB.success.jpg

    The most important thing, I think, in this whole process was naming convention. At the request of my good buddy and fellow grad student Travis, I named my new rig “CRACKBABY”.

    Once I got my crack baby all named and setup, to the command line I went!

    amdgpupro.jpg

    The most important steps here were getting Ubuntu to recognize the GPUs, and installing the mining equipment. Here are the steps:

    1. The first thing you need to do is install the dependency.
    2. $ sudo apt install software-properties-common

    3. Then, you can enable the repository and update apt.
    4. $ sudo add-apt-repository -y ppa:ethereum/ethereum
      $ sudo apt update

    5. Now, install the packages
    6. $ sudo apt install ethereum ethminer

    7. Next, you’re going to need a wallet to store the currency. I chose Mist.
      You need to install the dependencies if you’re going to use this option.
    8. $ sudo apt install libappindicator1 libindicator7

    9. With the dependencies installed, you can grab the latest release of Mist
      from the project’s Github page. You’re looking for the “Ethereum Wallet” package.
    10. Install the package with dpkg.
    11. $ sudo dpkg -i Ethereum-Wallet-linux64-0-9-0.deb

    12. Open up Mist and go through the setup. Save your private key
      and NEVER give it out.
    13. Your public key is how others send you money, and how you’ll get paid.

    14. Leave the application open to sync with the Ethereum network.
      It will take a long time and considerable hard drive space to synchronize everything.
    15. I recommend joining a pool to be profitable. Solo mining is hard.
      Joining a pool is easy, they have instructions on their page on how to connect.
      I chose Ethermine.
    16. Once the wallet syncs, and you’ve chosen a pool, it’s time to connect.
    17. $ ethminer -G -F your.poolurl.com:port/0xYOURWALLET.COMPUTER NAME --farm-recheck 200

    18. Replace your.poolurl.com:port with the pool you specified, those
      addresses will be specific to that pool and can be found on your chosen pool’s site.
      Replace 0xYOURWALLET with your public key, .COMPUTERNAME is up to
      you if you’d like to name your worker. –farm-recheck 200 is how often to check for jobs.

    That’s it!

    You can check the status of your worker using your pool’s website. On Ethermine they have an easy to access search function where you can plug your worker in.

    It was a really fun, albiet sometimes frustrating project. The hardest part of this whole process will be getting linux and ethminer to talk to your GPU. There are separate drivers and dependencies whether you buy a Nvidia or Radeon card, and it’s a PROCESS to set them up. I ended up ultimately returning the three RX550s for a pair of GTX 1070s. The hashrate of all three RX550s was less than a single 1070.

    doublegtx1070.jpg

    Using the settings I specified in this article I’m hashing at about 29 MH/s per 1070…

    crackbaby

    If this guide was helpful for you, you can tip me at ethereum: 0x92b2b7fb42c26b9469554db93be293ba263cfc88 or simply run the ethminer using my wallet address for a day or two (copy/paste):

    ethminer -G -F http://us2.ethermine.org:4444/0x92b2b7fb42c26b9469554db93be293ba263cfc88 --farm-recheck 200

    Update

    Eventually I expanded my operation to multiple rigs running 6x GTX 1070s each. I ran these miners successfully for about six months, then decided it was no longer cost effective after moving to a new state and paying a different rate for electricity.

    More questions? Feel free to contact me.

    Return to Table of Contents